Getting started with Python on Purdue Cluster Computing
As part of ABE 65100 Environmental Informatics you will have been
granted an account on the Scholar cluster hosted by ITaP Research
Computing
(https://www.rcac.purdue.edu/compute/scholar/).
Outside of the class you will need to request access
to Purdue clustered computing resources via the ITaP Research Computing
web site (rcac.purdue.edu), click on the Accounts -> Request Access link. You
should also check with your major advisor as they may also be able to
provide access to additional cluster resources, if they have purchased
access as part of their research program.
Once you have access to clustered computing, you can follow through with this tutorial.
Accessing Purdue University's Linux Cluster Systems
Thinlinc and the Scholar Cluster
-
Start your favorite browser from any networked computer.
-
Maximize the browser so that it takes up a full screen.
-
Go to the web site https://desktop.scholar.rcac.purdue.edu. You will use it a lot for this class so make sure to bookmark it.
-
You should now see the login screen, which looks like this:

-
Enter your Purdue career account username and two-factor authentication (pin,push or password,push) to log into the scholar thinlinc server.
-
The first time you login you will get a pop-up window that welcomes you to the scholar cluster and provides an overview of the system. Click OK to continue the login process.
-
Next you will get a pop-up window welcoming you to the first start of the panel, and asking if you want to "use the default config" or "one empty panel". Choose the default and it will open a desktop with multiple empty panels - the panels are like copies of the desktop or multiple monitors, which you can flip through to help organize your work. This choice is not that important as you can add and subtract panels from your workspace at any time, but the screenshots below will make use of the default panel setup.
-
You should now see a desktop that is running on the clustered computer systems (note the background may be different):

Warning
If this is your first time logging into RCAC cluster resources, and your desktop does not look like this one - specifically, if you do not have the toolbar across the top with the "Applications" pull-down menu, and the floating menu (see next image) in the bottom-center of the desktop:
STOP HERE!
Notify RCAC at rcac-help@purdue.edu that your default desktop in thinlinc is not configured correctly.
-
Look at the toolbar centered at the bottom of the screen
 ,
, and click on the Terminal Emulator icon (highlighted).
-
This opens a terminal window within the remote desktop, as seen in this figure:

The terminal will start with a prompt, in this case
cherkaue@scholar-fe02:[~] $followed by a white rectangle. Assuming you logged onto the scholar cluster, your prompt will be similar.As with many things in the Linux environment, the prompt is customizable, so if you have been given Linux/Bash startup files, your prompt may look different.
Note
The default prompt will start with the username@hostname, which for the screenshot is my username on scholar: cherkaue@scholar. This is followed by "-fe" and a number. This indicates the specific cluster (f)ront-(e)nd machine that is hosting your current login. In this case, I have logged onto front-end machine #2 of the scholar cluster. This is followed by a ":" and then the current directory. When you login to the system you should start in your home directory, which is aliased to the name "~". As you move through the system, the current directory part of the prompt will change, but the username and host machine will not unless you log in as a different user or log onto a different machine.
The front-end systems are your entry point for using Purdue's cluster systems. They are available for general use, such as editing your code, working with your files, running short scripts. If you need to make large or long process runs, then you are expected to submit your jobs to the queue system and make use of the true power of the clustered computing environment - that process will be covered later in the course.
When you (or any user) logs onto one of the cluster systems using the general name (i.e., scholar) the system will automatically assign you to one of several front-end machines. This spreads people out over available resources in an attempt to keep any one front-end system from being bogged down with too many users. So, for example, when an entire class logs on at the same time, you may find yourself on a different front-end system "00", "01", "02", etc. Which front-end machine you are using is generally not important as they are identical - we will discuss under what context it is important later in the course.
-
The white box after the prompt is the cursor, and is where keyboard text will appear when you type. If you open a second terminal, you will notice that the box in the first terminal will become hollow (see below). The filled box and changes in window color and fonts are how the GUI indicates which window is currently in focus. The keyboard only interacts with a window when it has the focus - just like in Windows, Mac OS X and Chrome.

-
Note that thinlinc opens a GUI interface with the remote computer, so you cannot move windows between the remote computer and your local computer. You will also find that the clipboard does not transfer automatically, instead you can copy and paste information between you local computer and the remote computer by opening the tool panel on the left edge of the thinlinc window and clicking on the clipboard icon. Text copied from the remote system will appear here and can then be copied into the local system clipboard. The opposite process also works.

Navigating on the Scholar Cluster
-
Next let's explore where we are in the remote system. The prompt indicates that you are in the "~" directory, which in Linux/Unix means that it is your home drive. This is equivalent to your U: drive on ECN systems, and W: drive on ITaP systems. You can see the contents of this directory / folder using the "ls" (list) command.

-
Assuming you have not previously worked on any of the scholar cluster system, you will find very little in your listing. This is not the same as the ECN or ITaP maintained home drives, so those files are not visible. This will be true on all of the cluster computers, however, scholar works a little differently from all of those. As a teaching system, scholar has an independent home drive, so what you do here is only available on the scholar cluster. If you log into one of Purdue's regular cluster systems (brown, halstead, etc) you will have access to your RCAC home drive, so you have access to the same preferences and files when you move between those cluster system - just like your settings and files move with you when you log into different systems on the ECN and ITaP networks.
-
For the purposes of the class, let's make a new directory called "ABE65100" using the "mkdir" (make directory) command.
mkdir ABE65100 -
Repeat the "ls" command and you should now see a folder named "ABE65100". Change into the folder using the "cd" (change directory) command.
cd ABE65100 ls -
First note that your prompt has changed with your location, it now indicates that you are in the ABE65100 directory that is a subfolder of your home directory (~/). Next note that the new directory is empty, so no files were displayed when you used the "ls" command.
Working with your Python code
Setting up SSH keys for GitHub access
Note
Most of the contents for this section is taken directly from the GitHub documentation pages for Connecting to GitHub with SSH. It has been modified to clarify the order of steps required to complete the pairing needed for using GitHub from the Scholar cluster for Environmental Informatics, and to provide context for why it needs to be done.
Since 2021, GitHub has required the use of extra security to access GitHub. This includes the replacement of passwords with unique tokens, the use of two-factor authentication, and the use of SSH keys. The first two of these pose unique challenges for use with the Linux command line. Thus as of Spring 2025, the recommended method for connecting with GitHub from the Scholar (or any RCAC) cluster system is to make use of SSH keys.
The Secure Shell (SSH) protocol is a method for encrypting network services over an unsecured network. In general, you can consider network traffic between Purdue operated network computers located on the main campus to be operating over a secure network. However, the network is only as secure as the weakest connection. If your network communications are being transmitted across an unsecured hotel or coffee shop WiFi, or to an unsecured home WiFi network, then it is effectively unsecured. Using Purdue's VPN service helps secure such connections, but still does not guarantee that your connection is entirely secure. Thus Purdue and most other network providers require the use of the SSH protocol to communicate or copy files between computers on a network.
The SSH protocol relies on the use of public-private cryptography to authenticate the remote computer and the user. This requires the creation of a public-private key pair, which controls the encryption and decryption of message blocks between computers on the network.
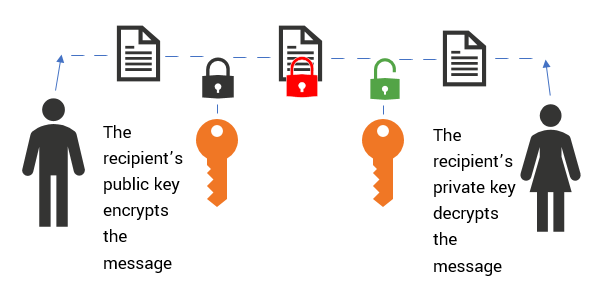
You create a public-private key pair on the local system. Then you share the public key with the remote system. From the local system, you request something from the remote system (e.g., access to log into the remote system, access to copy a file to or from the remote system, access to clone a repository from the remote system), then your public key is used to encrypt the data being transferred, and the private key is used to decrypt that information after the transfer.
Check for an existing SSH key-pair
Before you generate a new SSH key, you should check your local machine for existing keys.
Note
GitHub improved security by dropping older, insecure key types on March 15, 2022.
As of that date, DSA keys (ssh-dss) are no longer supported. You cannot add new DSA keys to your personal account on GitHub.com.
RSA keys (ssh-rsa) with a valid_after date before November 2, 2021 may continue to use
any signature algorithm. RSA keys generated after that date must use a SHA-2 signature
algorithm. Some older clients may need to be upgraded in order to use SHA-2 signatures.
-
Open Terminal.
-
Enter
ls -al ~/.sshto see if existing SSH keys are present.$ ls -al ~/.ssh # Lists the files in your .ssh directory, if they exist-
If you get a message that the directory does not exist, or the directory is empty then you do not have any current SSH-key pairs, and will need to proceed to creating a new pair.
-
Check the directory listing to see if you already have a public SSH key. By default, the filenames of supported public keys for GitHub are one of the following.
id_rsa.pub
id_ecdsa.pub
id_ed25519.pub
-
-
Either generate a new SSH key or upload an existing key.
-
If you don't have a supported public and private key pair, or don't wish to use any that are available, generate a new SSH key.
-
If you see an existing public and private key pair listed (for example, id_rsa.pub and id_rsa) that you would like to use to connect to GitHub, you can add the key to the ssh-agent.
-
Generate a new SSH-key
You can generate a new SSH key on your local machine. After you generate the key, you can add the public key to your account on GitHub.com to enable authentication for Git operations over SSH.
-
Open Terminal.
-
Paste the text below, replacing the email used in the example with your GitHub email address.
ssh-keygen -t ed25519 -C "your_email@example.com"Note
If you are using a legacy system that doesn't support the Ed25519 algorithm, use:
ssh-keygen -t rsa -b 4096 -C "your_email@example.com"This creates a new SSH key using the older rsa encyrption protocol, using the provided email as a label.
> Generating public/private ALGORITHM key pair.When you're prompted to "Enter a file in which to save the key", you can press Enter to accept the default file location. Please note that if you created SSH keys previously, ssh-keygen may ask you to rewrite another key, in which case we recommend creating a custom-named SSH key. To do so, type the default file location and replace id_ALGORITHM with your custom key name.
> Enter a file in which to save the key (/home/YOU/.ssh/id_ALGORITHM):[Press enter] -
At the prompt, type a secure passphrase. For more information, see "Working with SSH key passphrases."
> Enter passphrase (empty for no passphrase): [Type a passphrase]
> Enter same passphrase again: [Type passphrase again]
Add a new SSH-key to the ssh-agent
Before adding a new SSH key to the ssh-agent to manage your keys, you should have checked for existing SSH keys and generated a new SSH key.
-
Start the ssh-agent in the background.
$ eval "$(ssh-agent -s)"
> Agent pid 59566
Depending on your environment, you may need to use a different command. For example, you may need to use root access by running sudo -s -H before starting the ssh-agent, or you may need to use exec ssh-agent bash or exec ssh-agent zsh to run the ssh-agent.
-
Add your SSH private key to the ssh-agent.
If you created your key with a different name, or if you are adding an existing key that has a different name, replace id_ed25519 in the command with the name of your private key file.
ssh-add ~/.ssh/id_ed25519 -
Add the SSH public key to your account on GitHub. For more information, see "Adding a new SSH key to your GitHub account."
Adding a new SSH key to your GitHub account
You can add an SSH key and use it for authentication, or commit signing, or both. If you want to use the same SSH key for both authentication and signing, you need to upload it twice.
After adding a new SSH authentication key to your account on GitHub.com, you can reconfigure any local repositories to use SSH. For more information, see "Managing remote repositories."
-
Copy the SSH public key to your clipboard.
If your SSH public key file has a different name than the example code, modify the filename to match your current setup. When copying your key, don't add any newlines or whitespace.
$ cat ~/.ssh/id_ed25519.pub
# Then select and copy the contents of the id_ed25519.pub file
# displayed in the terminal to your clipboard
Tip
Alternatively, you can locate the hidden .ssh folder, open the file in your favorite text editor, and copy it to your clipboard.
-
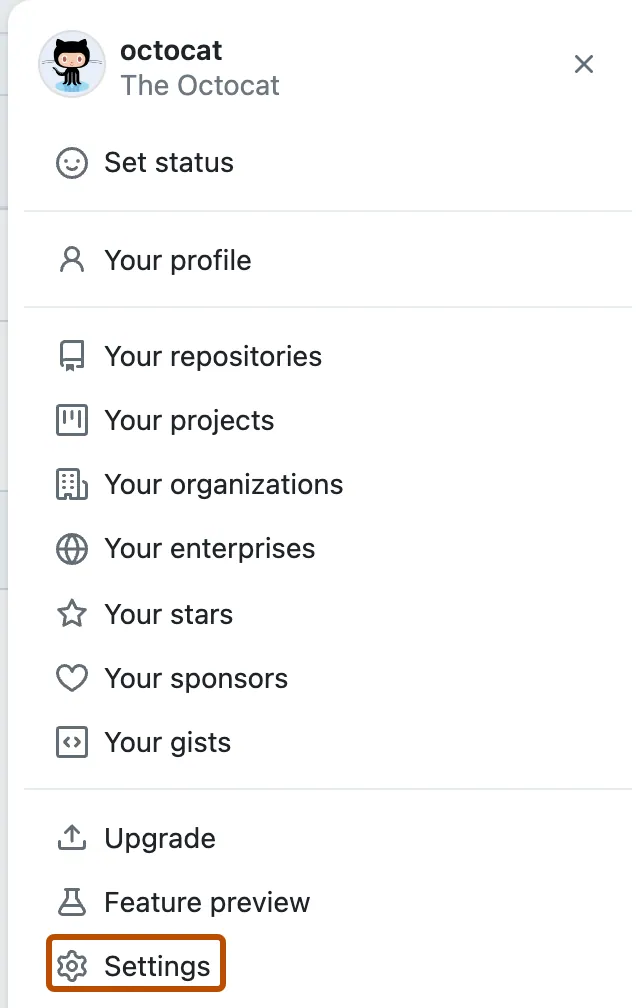
In the upper-right corner of any page, click your profile photo, then click Settings.
-
In the "Access" section of the sidebar, click SSH and GPG keys.
-
Click New SSH key or Add SSH key.
-
In the "Title" field, add a descriptive label for the new key. For example, if you're using a personal laptop, you might call this key "Personal laptop".
-
Select the type of key, either authentication or signing. For more information about commit signing, see "About commit signature verification."
-
In the "Key" field, paste your public key.
-
Click Add SSH key.
-
If prompted, confirm access to your account on GitHub. For more information, see "Sudo mode."
Testing the SSH connection
When you test your connection, you'll need to authenticate this action using your password, which is the SSH key passphrase you created earlier. For more information on working with SSH key passphrases, see "Working with SSH key passphrases."
-
Open Terminal.
-
Enter the following:
$ ssh -T git@github.com
# Attempts to ssh to GitHub
You may see a warning like this:
> The authenticity of host 'github.com (IP ADDRESS)' can't be established. > ED25519 key fingerprint is SHA256:+DiY3wvvV6TuJJhbpZisF/zLDA0zPMSvHdkr4UvCOqU. > Are you sure you want to continue connecting (yes/no)? -
Verify that the fingerprint in the message you see matches GitHub's public key fingerprint. If it does, then type
yes:> Hi USERNAME! You've successfully authenticated, but GitHub does not > provide shell access.For RCAC cluster resources, you may see a warning message like this:
Warning: Permanently added the RSA host key for IP address '140.82.112.3' to the list of known hosts.This is just warning you that you have added this connection to your lists of known hosts, so you will not be asked to authenticate yourself on future connection requests. This message is not a concern as long as you engaged in process - said 'yes' when asked to approve the connection. Answer 'no' would prevent further connections, so is not really an option.
You may also see this error message:
...
Agent admitted failure to sign using the key.
debug1: No more authentication methods to try.
Permission denied (publickey).
This is a known problem with certain Linux distributions. For more information, see "Error: Agent admitted failure to sign."
Note
The remote command should exit with code 1.
-
Verify that the resulting message contains your username. If you receive a "permission denied" message, see "Error: Permission denied (publickey)."
Cloning an existing repository
-
Now let's clone one of your previous assignments using Python into this new directory on the scholar cluster system.
-
First, navigate to the GitHub repository for the Using Python File Methods lab in your local browser. Here is a look at the template page for that assignment:

-
Click on the
 button and copy the SSH address
of your repository, if you have setup the SSH key. If you are not using
SSH keys, then copy the HTTPS link.
button and copy the SSH address
of your repository, if you have setup the SSH key. If you are not using
SSH keys, then copy the HTTPS link.Tip
You can always change the mode of the current repository clone, without starting over.
First check the current link type:
git remote get-url originIf this starts with
https://, then your clone is communicating using the URL and will require a username and token (GitHub.com) or passphrase (github.itap.purdue.edu). If the link starts withget@github.com, then it is using the SSH key to encrypt transfers.To change the mode of the transfer, use the command:
git remote set-url origin <new link>Where
<new link>starts withhttps://to work through the URL, orgit@github.comto work through SSH. -
Return to the thinlinc scholar window, and paste the web address into the clipboard.
-
Click on a terminal window. Make sure that you are in the ABE65100 folder we just created (the command "cd ~/ABE65100" will take you there, if you are not sure).
-
Now let's use git to make a local clone of the directory, use Edit → Paste from the terminal menu or "CTRL - SHIFT - v" to paste the contents of the clipboard where my command says GITHUB_address:
git clone GITHUB_address -
Run the command by pressing Enter - just like running a command in the Python command line interpreter.
Note
Be careful, if you have blank lines before the GitHub address in the thinlinc clipboard, pasting the contents will run the "git clone" command without the web address. The address will appear on a later line where it is not useful. If this occurs, you will get a long usage message about all of the git clone options that will scroll by on your screen. To fix the problem, return to the clipboard and make sure that the first line starts with the https:// of the GitHub repository. Now retype "git clone " and when you paste the address it should work.
-
If you have successfully established an ssh-key pairing with GitHub, then you will be prompted to enter the passphrase you used when creating the ssh-key (if you entered no passphrase, then there will be no prompting the command will execute without stopping.
-
If you did not establish the ssh-key then you will will see the following:
Warning
This method will not work with GitHub.com, so please follow the instructions for Setting up SSH keys for GitHub access.
This method will work with github.itap.purdue.edu.
-
GitHub will now open a pop-up window asking for your username at github.com (NOT Purdue). The box will not expand as you type, nor will it show what you type other than drawing a dot for each character typed. Type Enter, or click on the OK button to accept the username.
-
GitHub will then open a second pop-up window, this time it will ask for your GitHub password (again this is NOT your Purdue password).
-
-
If you pass security, then git will indicate that it is cloning the repository.
Accessing Anaconda in the current terminal session
-
When it is done, it will return the prompt to you, and if you type 'ls', you will see a new directory with the same name as your repository. Use 'cd' to change into that folder.
-
To get started with Python, let's start by loading anaconda, this is an installation of Python that has been packaged for large-scale data analysis and scientific computing. It is free like most distributions of Python (there are some companies that will charge to help you install, customize and maintain your Python installation, but they are charging for the service not for the language), but includes many of the extra modules we will make use of during class.
-
There are a lot of software packages available on the cluster computer systems. Some differ by the cluster, since some clusters are built specially to support specific activities, but there are a lot of common packages installed on every machine. Since most users do not need most of those software packages, and some packages do not work together well, all but a small set of defaults is managed through the "module" system. Type the following at the prompt to get a full list of what is available on scholar (or the current cluster system).
module avail -
This is likely to be too long a list to fit on a single page, so press the space bar to move through the pages. Once the full document has been displayed, your prompt will return.
-
As of 12 Feb 2021 the default version of anaconda is anaconda/5.1.0-py36, which would have been visible in the module list with a "(D)" to the right of the name. This version is suitable for most of the work in this class, but to see the list of all anaconda versions so that you can select the best version for what you want, use the following command at the prompt.
module spider anaconda ---------------------------------------------------------------------------- anaconda: ---------------------------------------------------------------------------- Versions: anaconda/5.1.0-py27 anaconda/5.1.0-py36 anaconda/5.3.1-py27 anaconda/5.3.1-py37 anaconda/2019.10-py27 anaconda/2020.02-py37 anaconda/2020.11-py38 ---------------------------------------------------------------------------- For detailed information about a specific "anaconda" module (including how to load the modules) use the module's full name. For example: $ module spider anaconda/5.3.1-py37 ---------------------------------------------------------------------------- -
This will cause the "spider" function to crawl the module list and return a listing like what was shown above that includes only available modules with "anaconda" in the name. RCAC will maintain a variety of versions that can be loaded as needed to run code with specific requirements, such as older code that requires Python 2.x or modules that rely on the latest versions. You can load any specific version by loading the full name (as seen below).
module load anaconda/2020.11-py38Your best choice is probably to simply load the default version of anaconda, since the default version will be updated regularly and keep you more or less up to date with packages and functionality. The default version can be loaded as:
module load anacondaNote
You can use copy and past inside of the terminal (highlight the year you want copied, and click the middle button to copy where the mouse is pointing) rather than having to type the full module name.
-
There will be no messages if everything works correctly (unless you had previously loaded a different anaconda version, in which case it will tell you what changed). Once loaded, you will have access to the full anaconda installation using the selected Python interpreter.
Running your Python code
-
We will now take immediate advantage of anaconda by having you start the Spyder Integrated Development Environment (IDE). This is a very different spyder, in this case a stand-alone application and not a function within the module application. Start spyder with the following command.
spyder &Note
The "&" at the end of the command makes the command run in the background. Without it the spyder command will open its separate window but the prompt will not return in the current window until you exit the spyder program. If you lock the shell in this way, you can pause spyder by typing
- while the window is active. This will freeze (suspend) spyder so it will not work but give you back your prompt. Now type "bg" at the prompt and spyder will be pushed to the background while the shell stays in the foreground. Both the terminal and the spyder session will now work (same as if you had remembered the "&" at the end of the command at the start). -
This will open a new window in your desktop as seen below.

-
If you have used Spyder IDE previously, this will be familiar, but if not the window has three parts:
- In the lower right corner is the interactive session with the interpreter (IPython console). This is where you should start, as commands you type at the window prompt will be immediately executed by Python, just like the examples in Think Python's first few chapters.
- To the left is the editor. Here you can enter multiple Python commands and save them as a script file that can be run later. You can also run the files in the panel immediately by pushing the green play button icon at the top of the spyder window. When scripts are run in this fashion, the output appears in the interactive console (see previous description).
- To the upper right there are a number of tools (click on the tabs to switch). By default these are the "object inspector" which will provide immediate help on commands when you select them in the editor or console windows, the "variable inspector" which will show you values stored in variables during program execution, and the "file explorer", which operates like Windows Explorer of Finder and allows you to search your directories to find files.
-
Test the IPython console by clicking in the lower right panel of the spyder program and typing
In [1]: print ("Hello, World!") Hello, World! In [2]: -
You can now open you previous assignment submission, and run it just like you have on your personal computer.
-
When you are done with the lesson, close spyder and click on the "Disconnect" icon in the upper right corner of the thinlinc page. This will close the session, but fear not if you log back in everything you were working on will still be there (unless RCAC has rebooted a system, which will happen a few times during the semester).