Introduction
Layering is an easy way to start new plants from old ones. The principle of layering is to encourage development of new roots on a stem while the stem is still attached to the parent plant. The rooted stem is then detached to become a new plant growing on its own root system.
Author
B. Rosie Lerner and Michael N. Dana*
*This publication was originally authored by John A. Wott.
**Figures 1, 2, 3 and 4 provided by Mary Lou Hayden.
Layering is an asexual propagation process, so all plants produced by layering have the same flower, fruit and foliage characteristics of the parent plant. In fact, layering often occurs naturally when flexible branches touch the ground and “take root,” as so often happens with the raspberry. Layering can be used to multiply many of your favorite plants now growing around your yard and in your home.
There are six common types of layering: air, simple, tip, trench, serpentine and mound. Air and simple layering are the most popular types.
Air Layering
Air layering, also known as pot layering or marcottage, was used by the Chinese centuries ago. In air layering, roots form on the aerial part of a plant after the stem is girdled or slit at an angle and enclosed in a moist rooting medium at the point of injury.
Air layering is especially useful for propagating house plants such as the Croton, Chinese Evergreen, Philodendron, Fiddleleaf Fig, Oleander, Camellia, Rubber Plant, Dracaena and Dieffenbachia that have grown too tall and have dropped their lower leaves. Usually, several weeks after the layer is made root formation will occur and you can repot a new, compact plant.
Shrubs and trees around your property can also be air layered. Air layers are usually made in the spring on wood of the previous season’s growth, or, sometimes, in the late summer with partially hardened shoots. The shoots used should be pencil sized or slightly larger.
Equipment
For air layering, you’ll need a sharp knife, a toothpick, rooting hormone such as IBA, a handful or two of moistened sphagnum peat moss, an 8 x 10 inch sheet of transparent polyethylene film (a refrigerator bag will do), twine, and florist ties, rubber bands or electrical tape. Many florist shops and garden centers also now carry inexpensive, ready-to-use air layering kits.
For air layering the sphagnum moss must be moist. Soak it in water for an hour or so and then squeeze it tightly to remove the excess water before use on the layer.
Cutting
Choose an area just below a node (where leaves attach to the stem), and remove leaves or twigs on the stem 3-4 inches above and below this point (Figure 1). Then, with a sharp knife, make an upward slanting cut 1 to 1-1/2 inches long up and to the center of the stem (See Figure 2). Do not cut through the stem! If air layering is attempted on a stem which has an extremely large top, then stake the top so that it will not completely break over when the cut is made. Brace open the cut “lip” with a toothpick to keep it from healing.
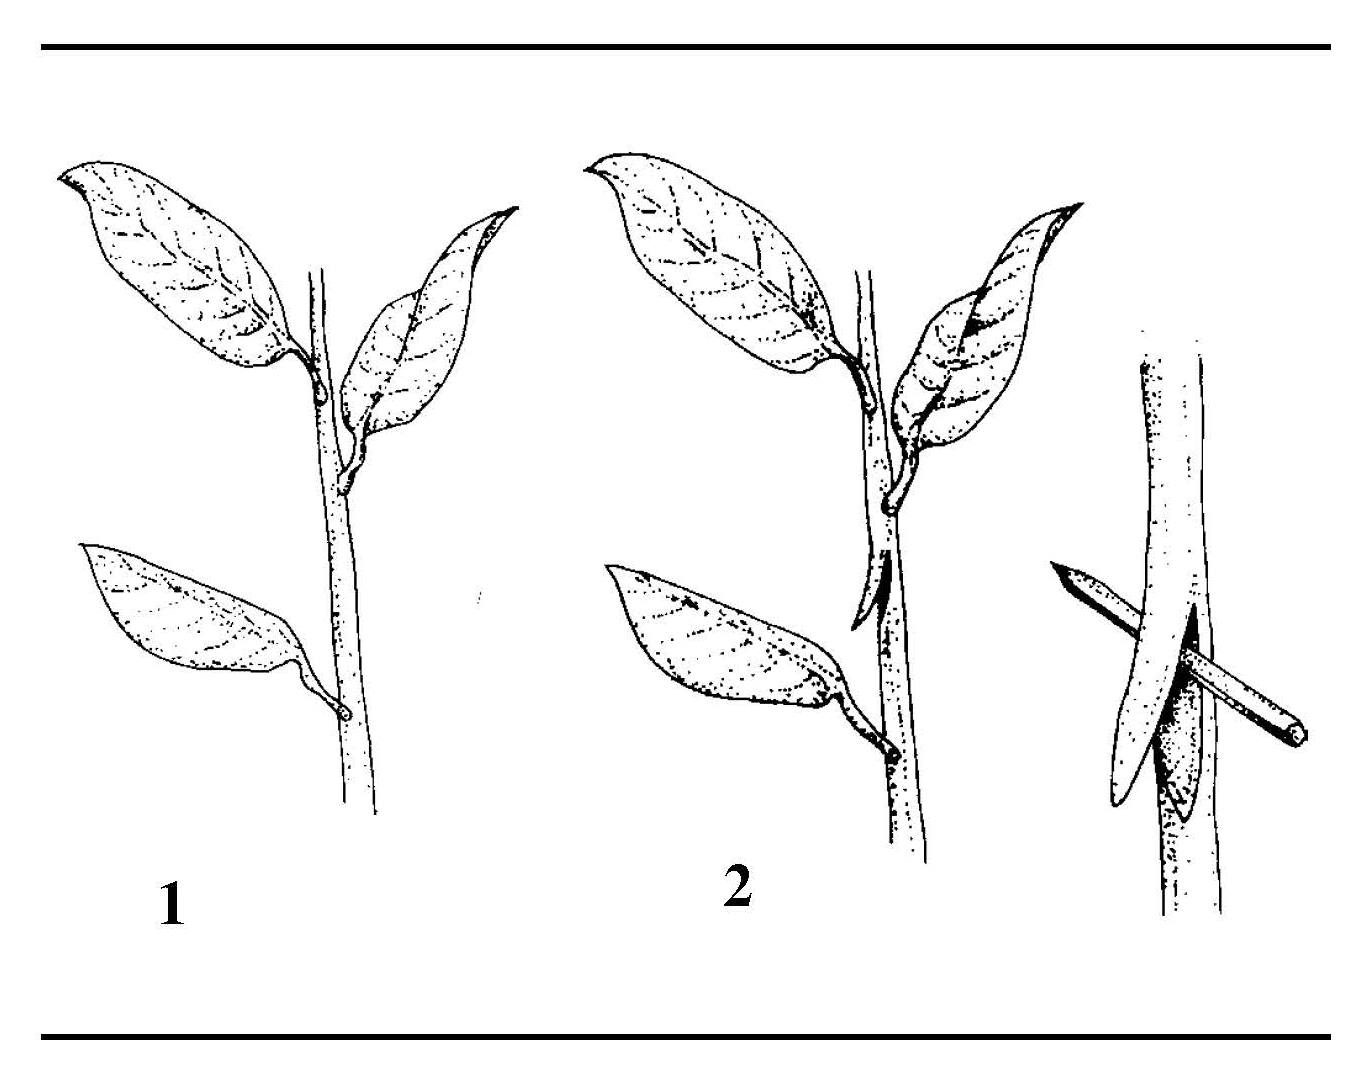
Then dust a little rooting hormone into the wound, especially to the upper edges of the exposed stem or between the two exposed surfaces of the cut.
Wrapping
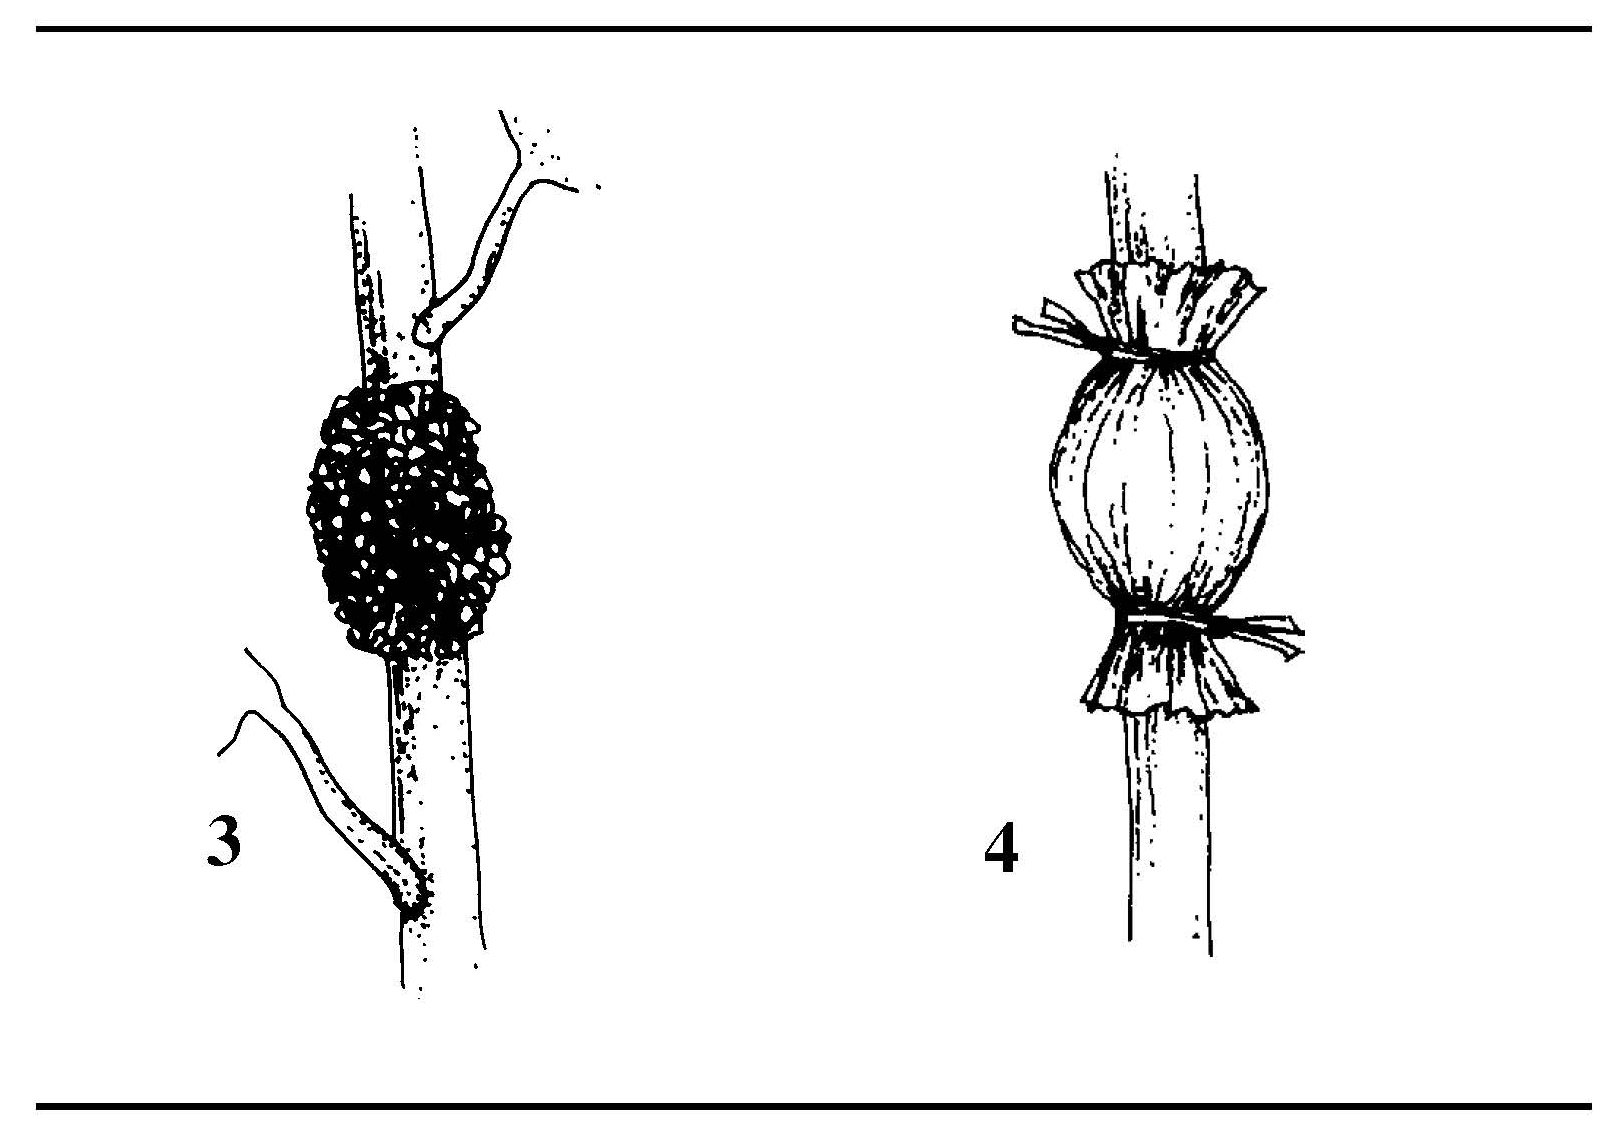
Cover the wound with two handsful of moist sphagnum moss, forming a football-shaped mass about six inches long and four inches wide. Hold the moss in place with twine (Figure 3). Then, to keep the moss moist, wrap it with the polyethylene film so the film overlaps. Fold the ends of the film so that the fold is placed on the lower side, as in wrapping meat. Then tie the two ends tightly with electrical tape, rubber bands or florist ties (Figure 4).
The plastic wrap and proper sealing should keep the layer from drying out. If exposed to the sun, cover the layer with aluminum foil or paper to prevent root scalding. Covering is usually not necessary inside the home.
Potting or replanting
After many weeks, roots can be seen through the moss. Remove the plastic film, cut off the new plant just below the roots, and carefully transplant. Care after removal is critical for the survival of the new plant. Pot house plants in a potting mixture. Set trees and shrubs in a one-half topsoil, one-half peat moss mixture. Do not disturb the moss and new roots, since the roots will break easily. Water the plants well, and if it’s sunny, shade them for a few days. If the top portion of the layer is quite large, some leaves should be removed to reduce water loss from transpiration. This enables the new plant to become established more rapidly.
Care
Water and care for the parent plant as you normally would. The air layer itself should need no additional care.
A good root system will form in 4-8 weeks on most house plant layers, and in one season or more on most shrubs and trees.
Simple Layering
Simple layering means bending a branch to the ground and getting it to root where it touches (Figure 5). This method is used mainly for shrubs with flexible branches, such as Forsythia, Spirea, and Rambler Rose.
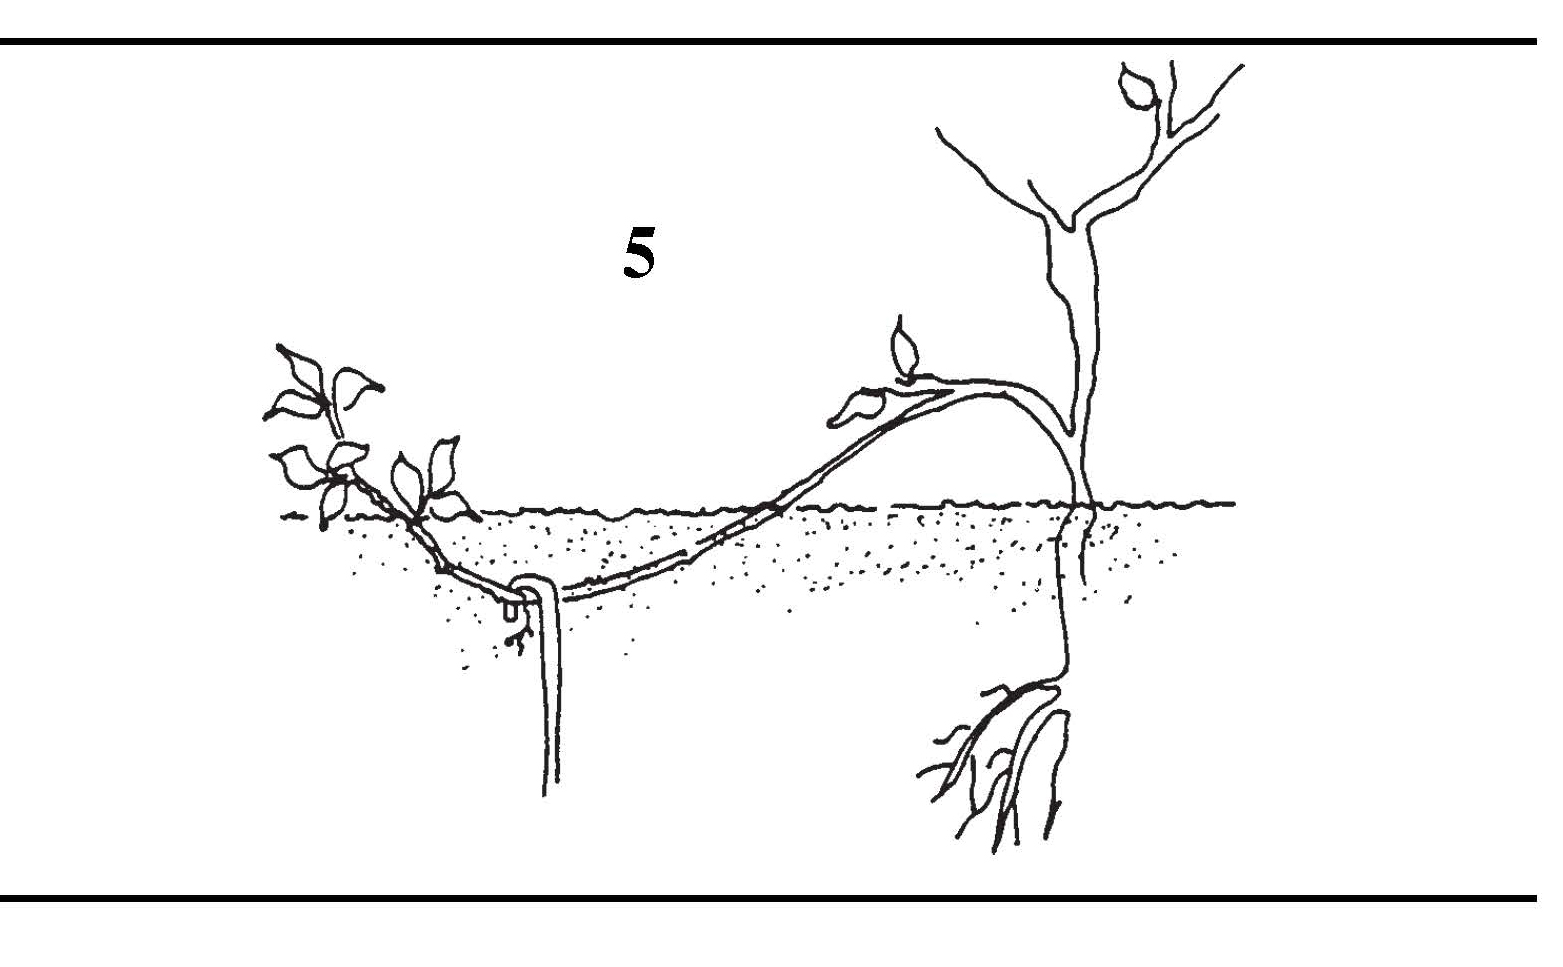
Select a healthy, pencil-sized branch of either dormant wood early in the spring or mature wood in the late summer. Bend the branch to the ground and strip the leaves around the area where it naturally touches. Be sure the branch is long enough so a few inches of leaves are left on the tip. Loosen or turn the soil where the branch touches, and mix in a little peat moss.
With a sharp knife, notch or split the stem just below a node, insert a toothpick, and add hormone as previously described. Then cover the area with two or three inches of soil and firm. Make sure the branch tip points straight up for a well-shaped plant. You might have to fasten the branch in the ground with a hairpin or a V-shaped stick or by placing a stone on top of the soil. Add peat moss and a mulch to the soil as a covering to keep the area moist.
The only care for simple layers is to keep them well-watered. Check periodically for root formation. It may take one or more seasons before the new plant is ready to transplant. Transplant in early autumn or before growth starts in the spring. Simply cut the connecting branch as close to the new plant as possible. Then remove the new plant, leaving plenty of soil around the roots, and transplant carefully.
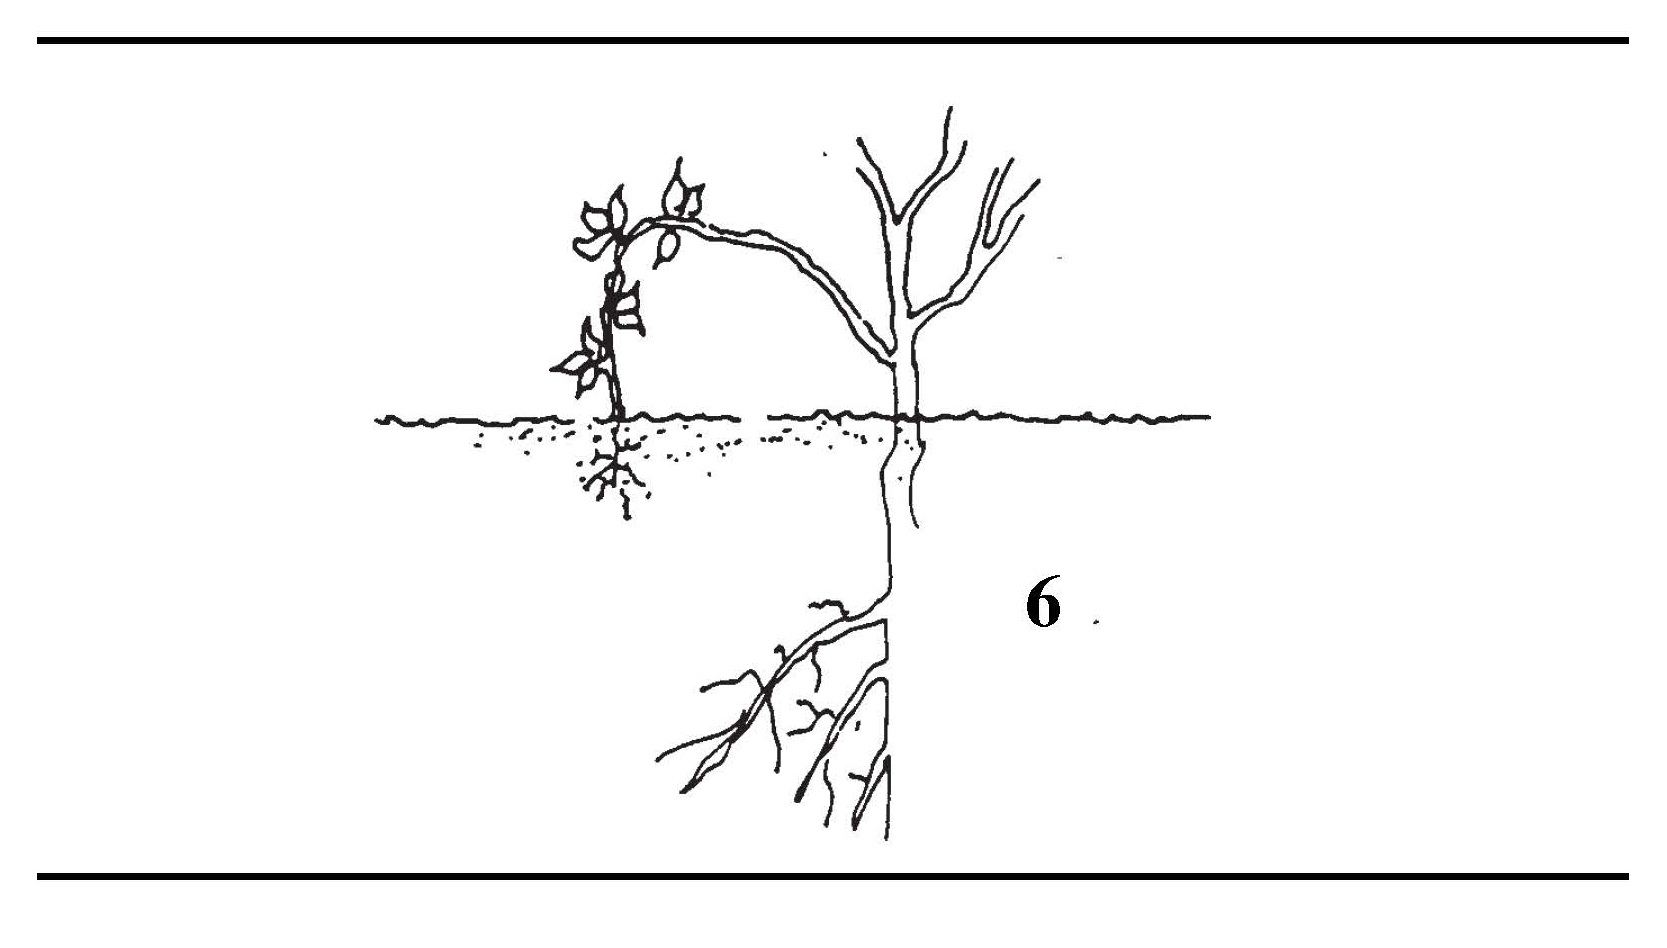
Tip Layering
Most plants with drooping growth habits can be propagated easily by tip layering (Figure 6). Tip layering is quite similar to simple layering. In tip layering, rooting occurs near the tip of the current season’s branch which touches the ground. This occurs naturally in black and purple raspberries, dewberries and trailing blackberries. The layers can be removed either in the fall or early spring and transplanted directly to new locations.
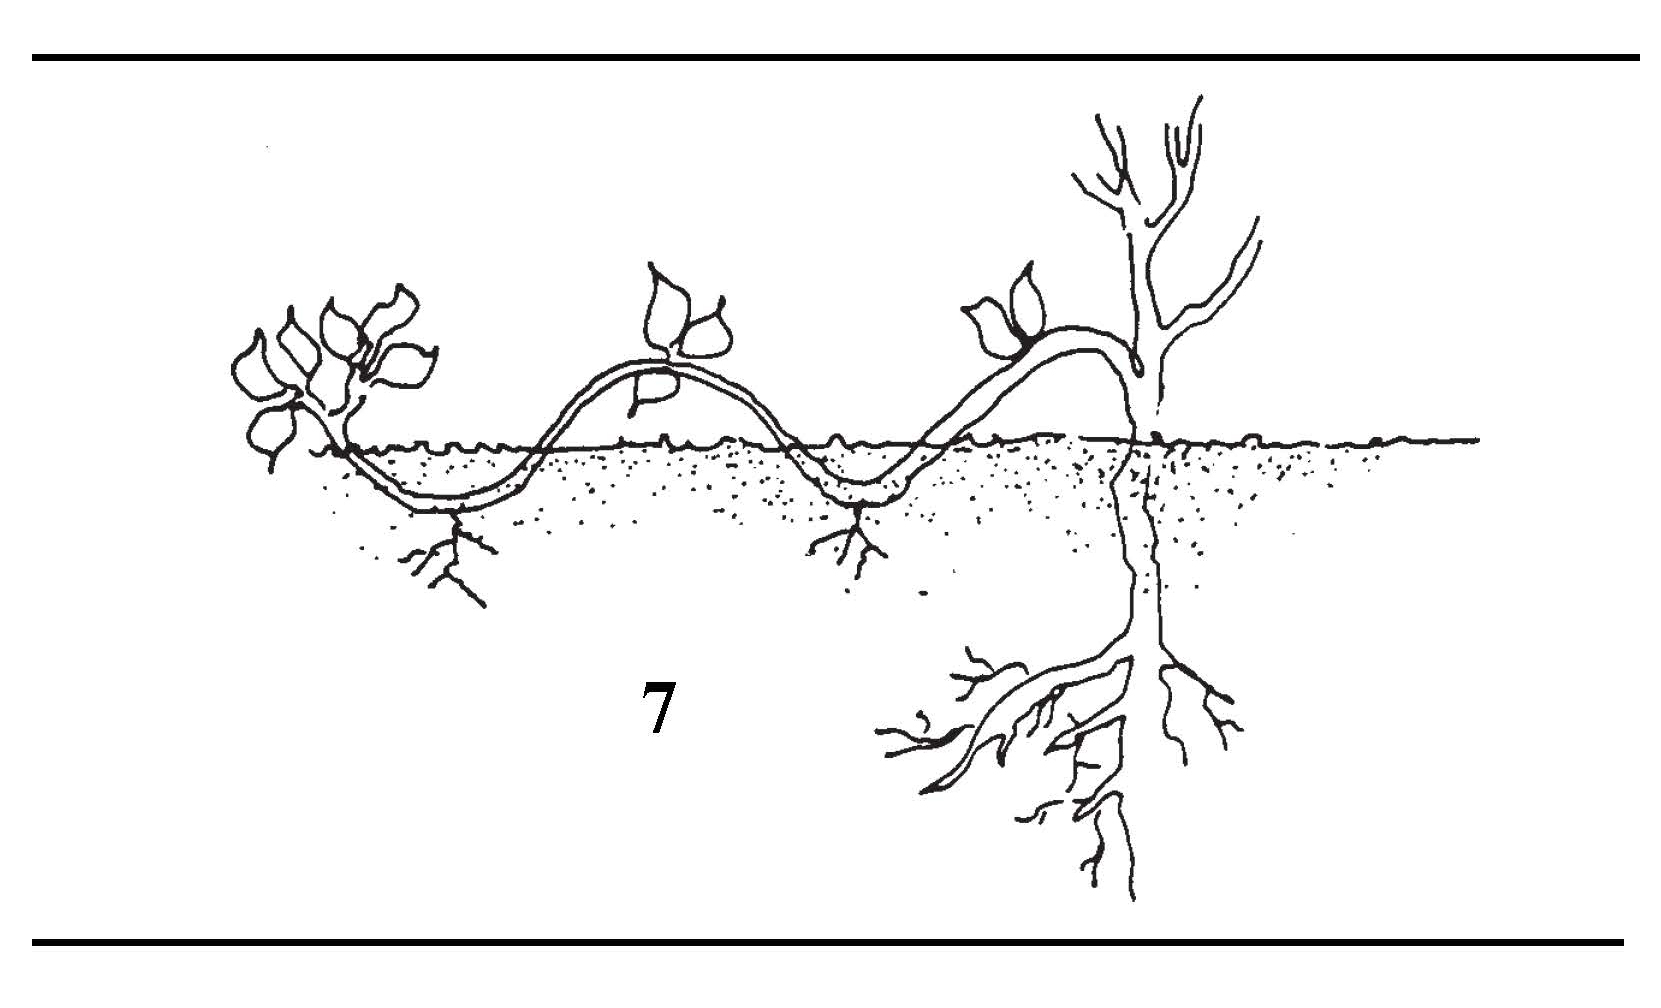
Serpentine or Compound Layering
Serpentine layering is like simple layering except more than one portion of the stem is alternately covered and exposed (Figure 7). Actually, each portion is rooted like a simple layer. The stem may be notched at the lower portion for each layer. Be sure that each exposed portion of the stem has at least one bud to develop a new shoot. After rooting, the stem is cut into several new plants. Serpentine layering works well with “viney” plants such as grapes, Wisteria, Clematis and Philodendron.
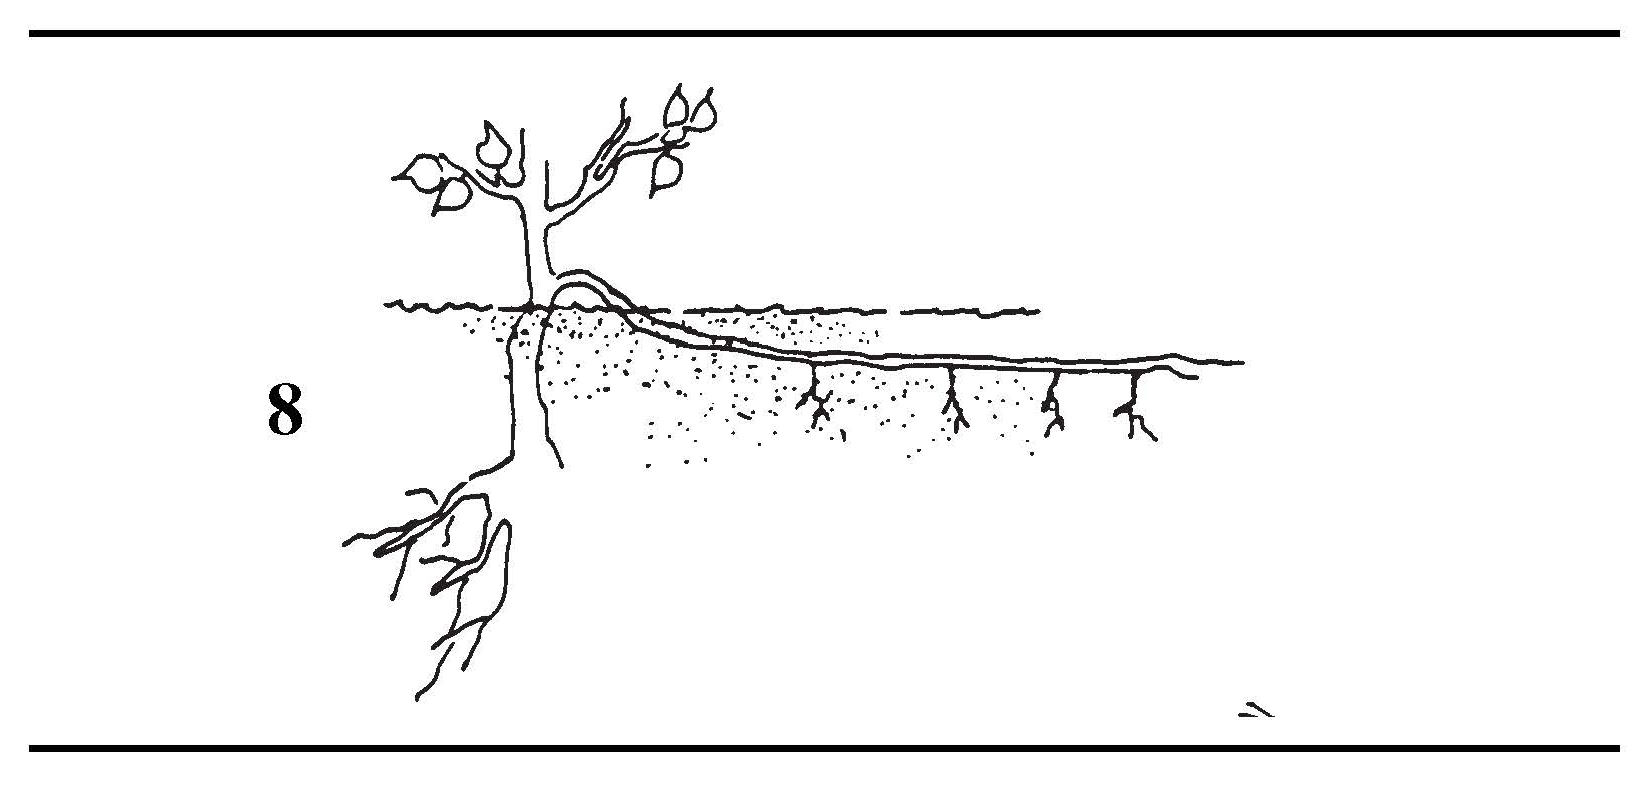
Trench Layering
In trench layering, a branch is laid horizontally in a small trench to encourage the development of several new shoots from it (Figure 8). As these shoots develop, soil is filled around them and roots eventually develop. The little plants can then be removed from the original branch after roots have formed. This method is used primarily for fruit trees which are difficult to propagate by other methods.
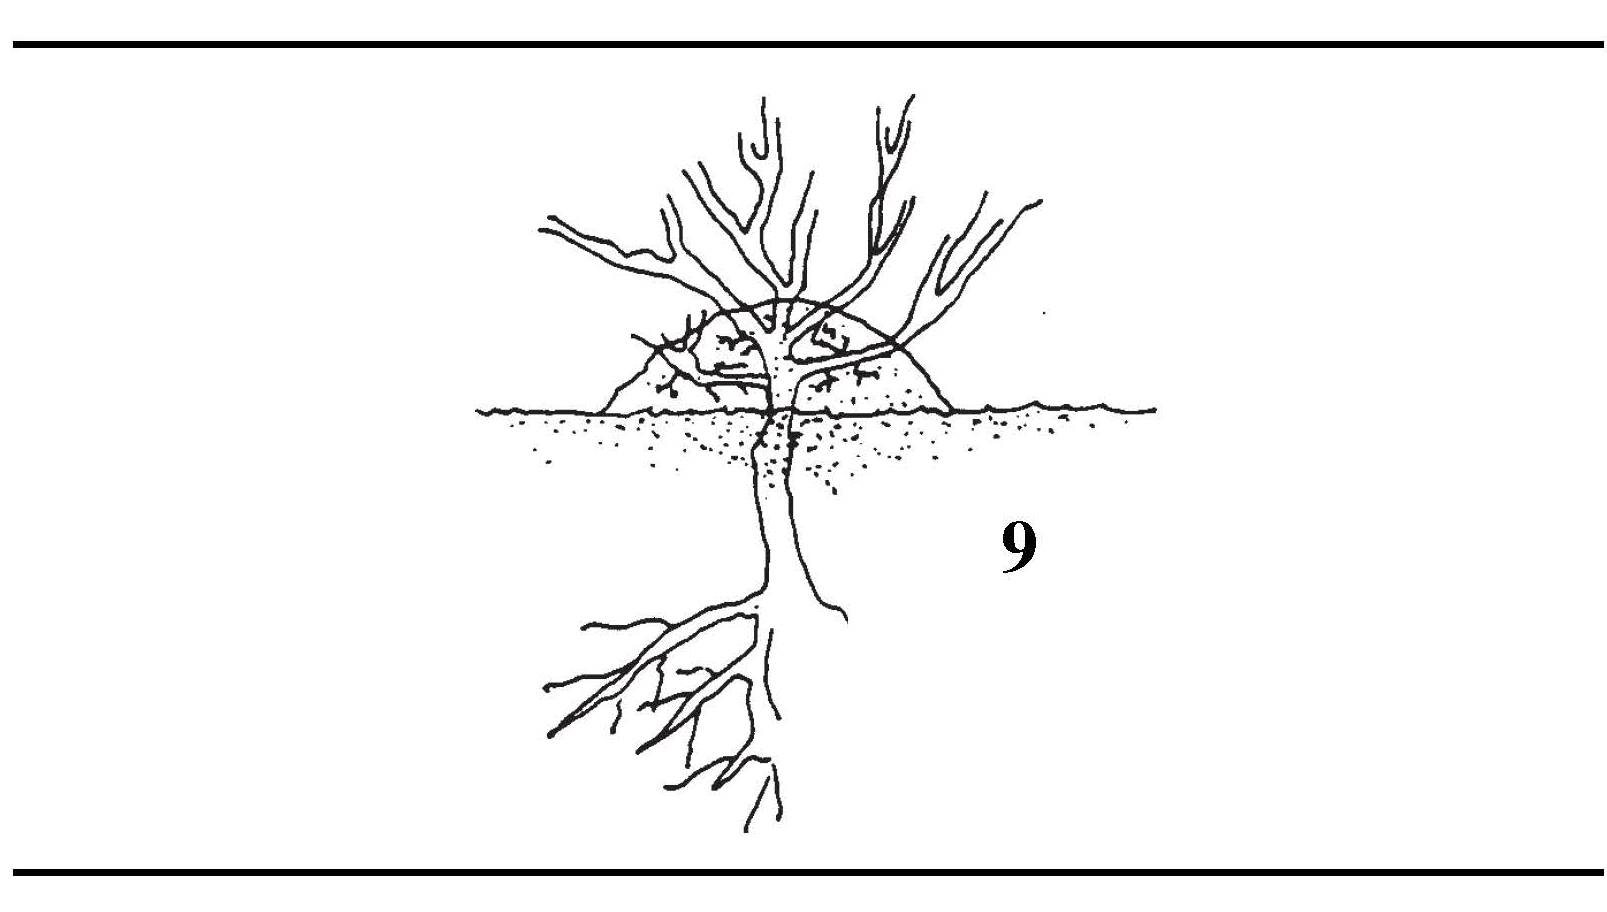
Mound Layering
Mound layering is useful with heavy-stemmed, closely branched shrubs, like Spirea, Flowering Quince, or Magnolia. It is also useful for fruit root stock production. The original plant may be cut back to encourage many new shoots to grow from the base. Then, the following spring after the new shoots have grown approximately 8-10 inches, mound soil containing sphagnum peat moss about 7-9 inches deep around the shrub (Figure 9). Roots will grow into the surrounding soil from the new growth. The following autumn or spring, gently dig into the mound, separate and transplant the new plants.