

Introduction
Hanging baskets extend a touch of the garden to the home, porch, or patio. Many garden flowers and foliage plants can be easily grown in hanging baskets.
Author
B. Rosie Lerner*
*This publication was originally authored by Juliann Chamberlain.
Selecting Plants
Choose the right plants for your hanging basket. For large baskets, combine only those plants that require the same growing conditions. For small containers, it is often better to use the same plant type in each basket. And for very small containers, usually just one good-sized plant is enough.
Baskets planted with annuals will flourish for one year and should be replanted each spring. Foliage plants can be grown for several years, depending on the plant type. Although some perennials grow well in hanging baskets, it may be impractical to overwinter them in containers.
Growth Requirements
Choose plants with similar requirements for sun and water. No matter how attractive a plant grouping may appear, unless the plants have similar growing requirements, their beauty will soon fade and they may die. Also, some plants may overtake others and the balance of the basket may become out of proportion.
Design
Design is not reserved for fresh flowers and foliage or dried materials. Any time a group of plants, or even a single plant, is assembled or used, some element of design should be considered.
Color
Use color for: direct contrasts (reds, greens or yellows, purples); in harmonious combinations (blues, violets, greens); or in a monochromatic scheme (all red). Consider yellow or purple pansies or all white petunias with lavender alyssum.
Use green foliage plants such as ivy, fern, and sprengeri fern, or the grey tones of dusty miller to provide a unifying and/or accenting effect. This is especially important when using boldly colored annual flowers.
Also, consider the color (or colors) of the basket. It should complement the colors of the plant and location where the basket will hang.
Form
Plants with trailing or vining forms are ideal for hanging baskets. Upright or erect plants can also be used, but they usually look best planted in the basket at a 45A angle. Interesting effects can be achieved through the grouping of contrasting plant forms. For example, the trailing lobelia combined with the upright geranium yields a contrast between the upright and trailing form.
Other considerations
Focal point — Where does the eye travel? If it is a large basket, there may be one larger, more noticeable plant. In small baskets, you may have just one plant, or the entire basket becomes the focal point.
Scale — Consider the size relationships between the plants, its container and the surroundings. Often the scale may change as the plants grow, but will the entire basket and its planting remain in proportion?
Proportion — This refers to the height, width, and depth of the basket and its plants.
Dominance — Does one plant dominate, or is the total effect created by all the plants?
Line — This gives a sense of direction to the eye. In most baskets, the lines are flowing and curved, rather than straight.
Rhythm — All hanging baskets should create the feeling of motion or movement. Usually broad, sweeping forms are best.
Balance — Will the basket and its plants remain stable for its useful life? Is the structure of the container and the plants so created that it will not become weighted to one side, or out of scale?
Choosing Containers
Though wire baskets make the most suitable hanging baskets, just about any container with holes for water drainage can serve the purpose. Margarine dishes, old bleach bottles, plastic pots, Styrofoam, clay or ceramic containers, wooden boxes, and even large dried gourds have all been used for hanging planters.
Choose the hanging basket you will use according to its type and size. Give some thought to the size relationships between plants, container and surroundings, as well as the overall shape of the container and its final placement. The container should be in proportion and scale with the plants you plan to grow. Decide whether the container will become an important part of the total design or is merely there to support the plants. A large, bold container filled with small delicate plants is usually inappropriate.
Healthy plants require adequate drainage. Self-contained pots with no drainage holes can be made suitable by using a pot-in-pot arrangement (Figure 1) or by adding a dry well or drainage layer (about 1/4 depth of container) to the container bottom. Three or four punctures made with a sharp knife through lined containers will also supply necessary drainage. Improper drainage is a frequent cause of poor plant growth in containers.
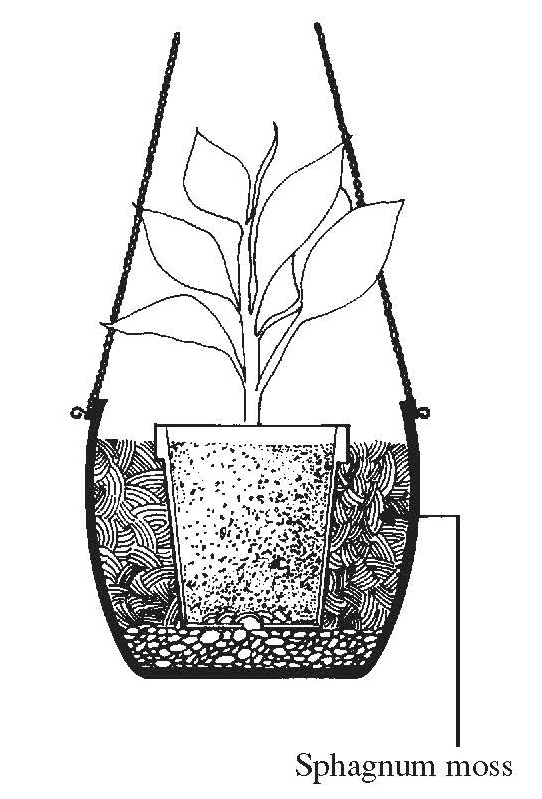
Figure 1. Pot-in-pot arrangement. Plants must be grown in a container that
has a hole through which water can drain. When using a hanging basket
without drainage holes, place in a pot that will allow excess water to drain
from the soil. Place the potted plant inside the hanging basket. Pebbles
in the bottom of the hanging basket allow water to collect away from
plant roots.
As plants grow and especially after watering, the weight of the basket increases. Therefore, it is very important that thought be given to the method of support used. Whether chains, ropes, wires or macramé, too much weight for the support may mean a total loss if the basket crashes to the ground.
Preparing Soil
Adequate water drainage is essential for plants grown in hanging baskets. Ensure good drainage by mixing soil with liberal amounts of sand or perlite. These materials help aerify the soil, improve root growth, and allow water to easily penetrate the mixture.
A good soil mix includes two parts peat moss, one part sand, and one part perlite; or one part silt or clay loam garden soil, one part organic matter (peat moss), and one part coarse sand or perlite. Commercial potting soils can also be used.
A slow release formulation of balanced fertilizer (such as 12-12-12) applied according to label directions will allow nutrients to be released gradually over time. It is best to mix in the fertilizer prior to planting the basket, rather than trying to apply to the top of the soil later.
Planting Your Basket
Step 1 — For planting wire baskets or similar containers, line the basket with a 2-inch layer of sphagnum moss, sheet moss or plastic (1 to 1-1/2 ml), doubling edges underneath. Moist moss should be snugly packed into the basket and checked carefully for holes through which soil and water can leak. When the plants are small, the outside edge should be as attractive as possible. As the plants grow and cascade, they usually will cover the basket.
Step 2 — Fill the container with the soil mixture to within an inch of the top rim. Adding large amounts of soil after the plants are placed is often difficult. The basket is also easier to plant if filled with soil before the plants are inserted. Be sure to use sterilized tools and containers so you will not introduce disease organisms into the soil. Tools can be cleaned by rinsing in a chlorine bleach-water solution (1:10 by volume).
Step 3 — Using a garden trowel or dibble, carefully dig a hole for each plant. Place transplants slightly deeper than the soil line on the pot. If the plants are growing in peat pots, it is best to remove the edges and bottoms of the pots for better soil contact. Firm soil carefully around each plant with your hands. Woody or erect plants look better when placed outward at a 45A angle. Plants that have become root bound should be carefully removed from their pot and set with roots well spread.
The number of plants necessary for each pot will vary. Large single specimen plants often are useful for a single container. For a single variety basket with a diameter of 10-14 inches, often three plants placed around the outside edge of the basket are sufficient.
Step 4 — When using a wire basket, the “sides” of the container may be planted as well as the top, to give a cascading effect. Any sharp tool that will make a hole through the moss lining and into the soil can be used. Holes placed at different levels along the sides of the basket give the most attractive appearance. Carefully insert each plant through the hole made in the moss lining into the soil of the basket. Press moistened moss into the hole around the plant to secure it. Though many plants are suitable for side planting, small flowering plants (alyssum, pansies, miniature marigolds, fibrous-rooted begonias) are often the best.
Baskets lined with black plastic may also be used for side planting, but usually the plants are inserted from the inside outward, and the basket is filled one layer at a time.
Step 5 — Soak the basket thoroughly with water and allow it to drain. Additional soil may be added if the soil level sinks. Make sure all roots are covered with soil. Be sure not to overfill the basket, or watering will be difficult. Place newly planted baskets in locations with filtered sunlight for 2-3 weeks while plants become well established.
Care
After the plants become established, baskets should be placed where they will grow best, according to species.
Most baskets growing in direct sunlight require watering attention each day. Even those planted in moss will require frequent waterings because all sides of the container are exposed to drying air.
Water baskets thoroughly from the top and syringe sides with water when the soil is dry 1/4 inch from the surface. A basket placed outdoors in the summer may need a daily soaking. A special watering “wand” for baskets makes the watering hose easier to handle.
Fertilizing plants every other week with a soluble plant food encourages good growth and flowering (if slow-release fertilizer was not included in the potting soil). When specific plants become overgrown or out-of-bounds, they can often be pinched back to bring the basket into balance.