Vegetable grafting has attracted tomato growers’ attention as an approach to control soilborne diseases and improve crop yield. By grafting scion plants that have desirable fruit characteristics onto rootstock plants that have disease resistance, stress tolerance, or vigorous root system characteristics, grafted plants combine beneficial traits from both the scion and rootstock plants. Many growers who are interested in growing grafted tomatoes may be hindered by the high cost of already grafted plants. Growers may prefer to graft their own tomato plants to reduce costs or increase cultivar selection (including the selection of organic seeds). This publication introduces tomato grafting techniques that are particularly suitable for small-scale production.
Successful tomato grafting includes three steps:
- Raising healthy seedlings (pre-graft)
- Grafting
- Post-graft plant healing
Authors
Wenjing Guan and Steve Hallett
Horticulture and Landscape Architecture
Contents
Pre-graft: Scion and Rootstock Seedling Production
How to Splice GraftKey Terms
grafting — A cultural practice that helps control soilborne diseases, improve abiotic stress tolerance, and enhance crop yield. It is commercially used on solanaceous and cucurbit crops.
scion — A plant that has desirable fruit characteristics.
rootstock — A plant that has desirable disease resistance, stress tolerance, or vigorous root system characteristics.
meristem — Plant tissue that contains undifferentiated cells from which growth begins. Also known as growing points.
adventitious roots — Roots that develop from stems. cotyledons — The leaves that first emerge from a seed.
cotyledons — The leaves that first emerge from a seed.
Pre-graft: Scion and Rootstock Seedling Production
Raising healthy scion and rootstock plants is the first step to grafting success. Provide optimal seed germination and growth conditions for both rootstock and scion plants. Tomato’s ideal germination temperature is around 85°F. You may need a heating mat to germinate rootstock and scion seeds in the early spring. Do not graft plants that show disease symptoms or are severely stressed during germination and early growth.
You can greatly enhance the efficiency of grafting if you produce uniform seedlings. Grow rootstocks and scions that have similar stem diameters at the time of grafting. Since germination and growth rates vary among varieties, you often need to plant the rootstocks and scions at different dates to achieve these similar stem diameters. However, there is no general rule for planting one seed type earlier than the other, because several factors influence the relative germination and growth rate of the two plants, including different rootstock and scion combinations, environmental conditions, and seed quality.
Researchers at Ohio State University have reported on the time from seeding to grafting size in “Eighteen Rootstock and Five Scion Tomato Varieties: Seedling Growth Rates Before Grafting and Success in Grafting the Ninety Variety Combinations” in the Midwest Vegetable Trial Report for 2014 (Purdue Extension publication 16-18-14), available from the Education Store (www.edustore.purdue.edu) or at ag.purdue.edu/hla/fruitveg/Pages/MVVTRB.aspx.
We recommend you perform an on-farm test with a few of the rootstock and scion seeds of the specific varieties of interest to determine how many days you need for rootstock and scion plants to reach grafting size. If conducting a test is impractical, use information from the Ohio State report, and remember that most rootstock and scion varieties can be planted on the same day.
The growth rate may be moderately adjusted after seed germination by manipulating temperature, light intensity, and water and fertilizer application rates. Although having identical stem diameters of rootstock and scion plants is desired, you may still achieve a high survival rate despite some dissimilarity in stem diameter. Also, you can cut plants slightly higher or lower on the stem to select size-matched areas of the stem to graft.
If plants are actively growing, reduce watering before grafting to prevent too much water going up the stem and pushing the scion off. However, it is important to make sure the potting medium is moist before grafting.
For early-season high tunnel/greenhouse tomato production, producers often grow tomato plants to a large size before transplanting into the ground. It is reasonable to start rootstocks in large planting pots. Scion plants, however, can grow in smaller sized cells, because they will only grow in the medium until grafting. Although growing scions in smaller cells could save greenhouse space and reduce the cost of materials, you must graft plants before the plants outgrow the cells. Growing scion plants in standard planting trays with 72-cell size works well for the purpose.
Grafting
You can successfully graft tomato seedlings with a wide range of sizes. However, plants at a younger stage generally heal faster and require less stringent conditions for post-graft plant healing.
At a minimum, the stem diameters of both rootstock and scion must be at least 1.5 millimeters — the smallest grafting clips are 1.5 millimeters. Grafting will require silicone grafting clips, which come in diameters from 1.5 to 3.0 millimeters. You can also use side grafting clips (which are often used for grafting cucurbits) to graft larger tomato plants, but they are more expensive.
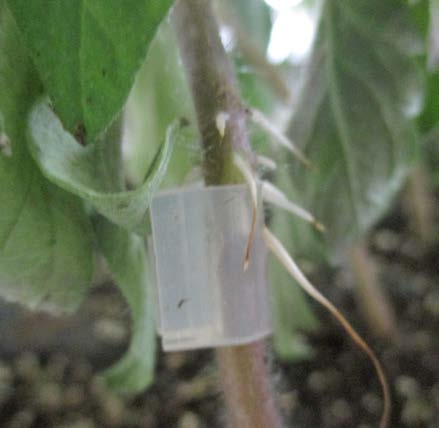
Tomato plants normally need two to three weeks to reach a stem size of 1.5 to 2 millimeters after sowing. The best way to determine if the timing is right to graft is to put a grafting clip on the stem. If it fits tightly, the plants are ready to graft (Figure 1). We recommend using transparent grafting clips. Transparent clips allow you to see how well you match the cut surfaces of the rootstock and scion plants through the clip (Figure 2).
To make graft cuts, you have options. Grafting knives are designed to ensure consistent cutting angles, but they are more expensive than common razor blades. A half-size double-edge razor blade works well for tomato grafting, and its low cost allows you to replace them after a few grafts, which prevents potential contamination if pathogens are present on the graft tool. If you use a grafting knife, it is very important to sanitize it frequently.
rootstock and scion match — the surfaces in this graft do not match, which could
lead to graft failure.
HOW TO SPLICE GRAFT
The most common grafting method for tomato is splice grafting.
Step 1: Cut the Rootstock Stem
With splice grafting, the first step is to cut the rootstock at the stem at a deep angle (Figure 3A). The deep angle creates more surface area on the cut than a flat cut would, which allows more cells from the cut surfaces of rootstocks and scions to fuse together (an essential step in graft healing).
You can cut the rootstock either above or below the cotyledons. The advantage of cutting above the cotyledons is that you will have more space between the graft union and soil, which means grafted plants are less likely to develop adventitious roots from the scion.
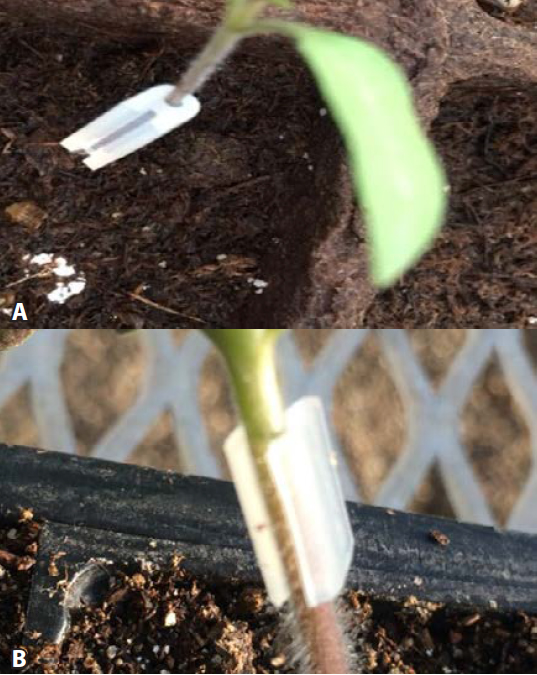
However, cutting the rootstock above the cotyledons can create the problem of rootstock regrowth (that is, rootstock suckers). If you cut the rootstock below the cotyledons, it completely eliminates the sucker problem because that completely removes the rootstocks meristem tissue. It is critical however, to pay close attention during transplanting to ensure that the grafting union stays above the soil (Figure 4).
Step 2: Place a Grafting Clip on the Rootstock
Second, after you cut the rootstock place a grafting clip halfway over the cut stem (Figures 3B and 3C). It is important to orient the grafting clip along the side of the graft cut so that it holds the graft union securely (Figure 3C).
Step 3: Cut the Scion Stem
Next, cut the scion stem at the same angle as the rootstock (Figure 3D).
Step 4: Insert Scion Stem into Grafting Clip
Then, insert the scion stem into the grafting clip. As you do, make sure the cut surfaces of the rootstock and scion are oriented correctly and in full contact with each other (Figure 3E and 3F). If you cut the rootstock and scion stems at different angles, they may not come into contact sufficiently and may not heal (Figure 5).
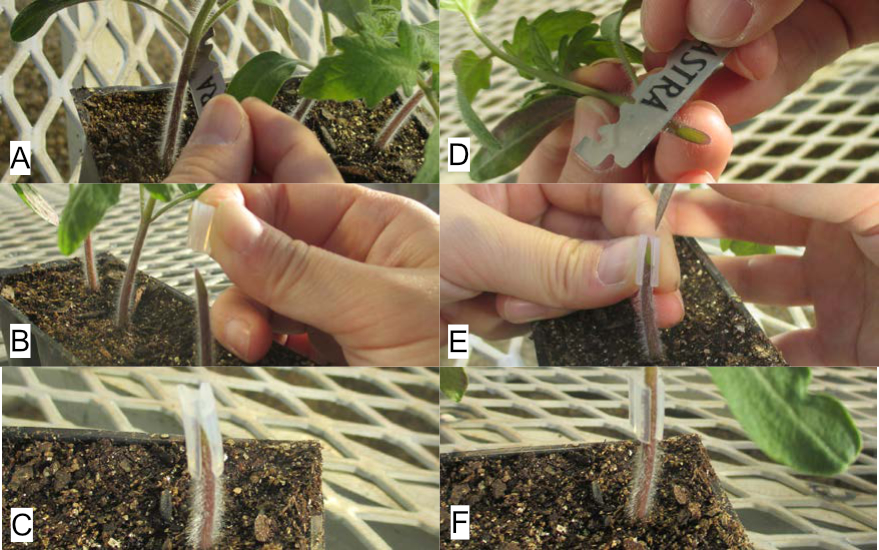 Figure 3. The procedure for splice grafting tomato plants. A. Cut the rootstock at the stem at a deep angle. B. Place a grafting clip halfway over the cut stem of the rootstock. C. Make sure to orient the grafting clip along the side of the graft cut. The cut side of this rootstock faces right in this image. Note the direction of the grafting clip. D. Cut the scion stem at a similar angle as the rootstock. E. Insert the scion into the grafting clip. F. Make sure the cut surfaces of the rootstock and scion are in contact.
 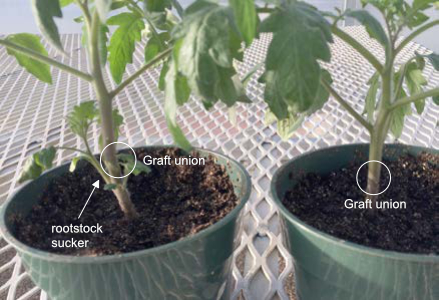 Figure 4. The plant on the left has a higher graft union than the plant on the right, because the rootstock on the left was cut above the cotyledon. Note that this plant developed rootstock suckers (which must be removed by hand) from the meristem tissue where the cotyledons were originally located. The plant on the right was cut below the cotyledon and does not have rootstock suckers.
 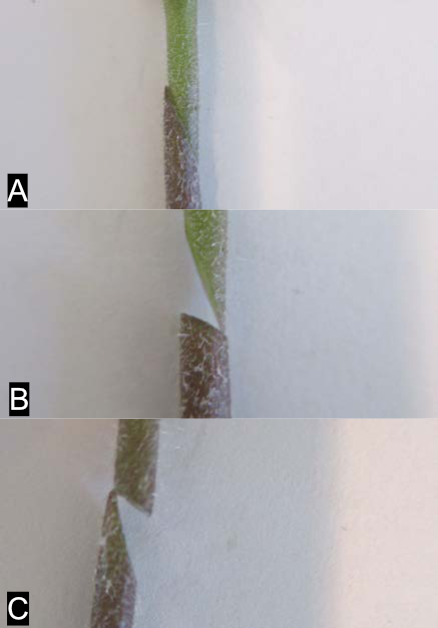 Figure 5. Cutting rootstock and scion stems at different angles could result in graft failure. A. This rootstock and scion in this example are cut at similar angles, an essential step to ensure graft success. B and C. The cut angles in these examples do not match. These grafts are likely to fail.
 Tips to Ensure Success
Before transplanting grafted plants, it is important to scout for and remove any rootstock suckers you find. You must remove these suckers by hand.
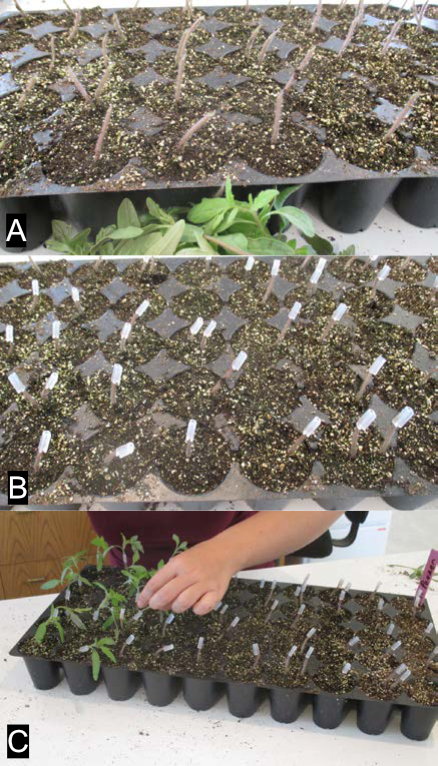
To increase graft efficiency, experienced grafters normally conduct one step for all plants before moving to the next step (Figure 6). However, you need to make sure that the cut surfaces of the plants do not dry out before you graft them, or it will reduce grafting success. Placing scion cuttings in sterile water can extend the time from cutting to insertion.
Graft tomato plants in a shaded area where there is no wind and the temperature is between 72°F and 85°F. Also, it is best to perform the grafting operations close to the area where post-graft plants will heal.
Post-graft Plant Healing
The post-graft healing environment and acclimation process is essential to graft success. Neglecting postgrafting care will likely result in failed grafts. Depending on the plants’ growth stage at the time they are grafted, plants should be ready to grow in normal greenhouse conditions six to 10 days after grafting.
The first 48 hours after grafting is the most critical time for graft healing — the grafted plants will form new vascular cambium during this period. Immediately after grafting, it is helpful to mist them with water from a spray bottle — this can help prevent them from wilting immediately. Promptly place newly grafted plants in an environment that has a relative humidity between 85 and 95 percent and temperature between 72°F and 85°F — keep them in this environment for the first 48 to 72 hours (Figure 7).
Although a greenhouse might be a spacious place to build a healing chamber, it is an unsuitable location for graft healing if the temperature fluctuates widely. Our experiments show that grafts often fail when temperatures are above 100°F.
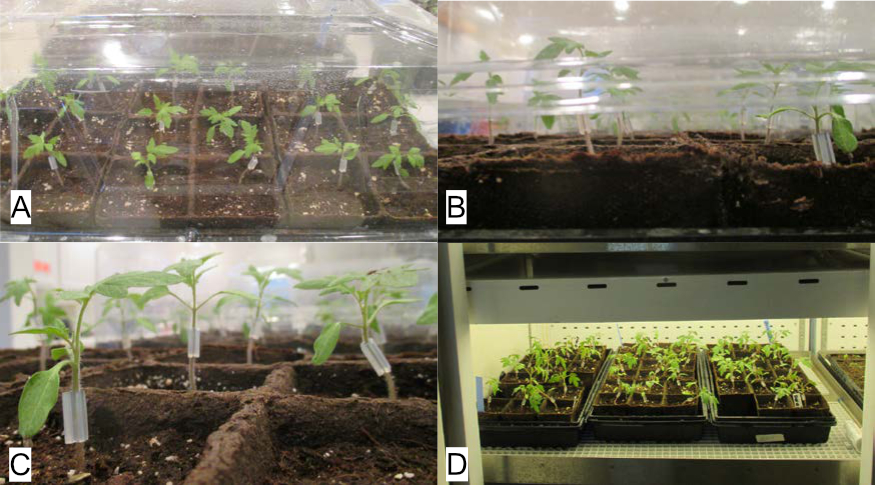
The easiest way to maintain a constant temperature is to heal grafted plants indoors with the temperature set at 72°F to 75°F. You can achieve the desired humidity using a humidifier inside a closed structure such as a large container, a healing chamber made with PVCpipes, or a plastic-covered shelf (Figure 8). But be careful: In small spaces, humidity can easily jump to 100 percent and result in condensation on the plants. If this happens, turn off the humidifier manually or control it with a timer.
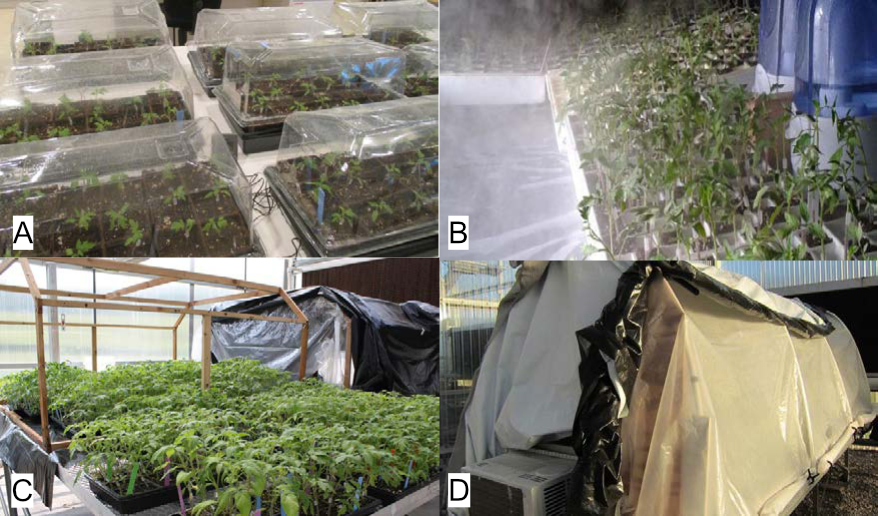
Figure 8. Healing chamber designs. A. Use plastic domes to cover plants and keep plants indoors. B. Use humidifiers to increase humidity inside a closed structure. C. This healing chamber was built with wooden sticks and covered with clear and black plastic inside of a greenhouse (photo by Sanjun Gu, North Carolina Agricultural and Technical State University). D. This healing chamber was attached to an air conditioner to reduce temperature in the middle of the day in a greenhouse.
Mist newly grafted plants with a spray bottle right after grafting and cover the whole flat with a plastic dome that has been sprayed with water inside. This will help achieve desirable humidity during the first two days. We find this is the most efficient approach for small numbers of plants grafted at young stages.
It is important to place newly grafted plants in low-light conditions during the first few days to reduce water loss through transpiration and evaporation; however, absolute darkness is not necessary. An indoor area with dim light is efficient for graft healing. If the healing chamber is in a greenhouse, use shade cloth or other material to reduce the light level in the chamber.
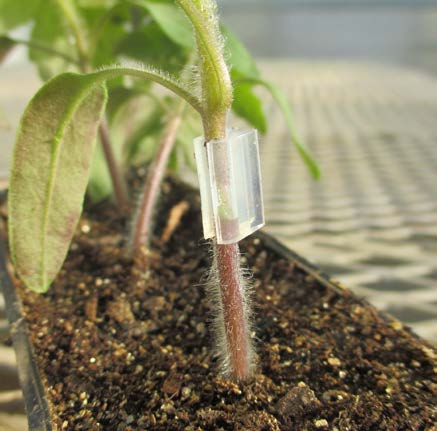
After two or three days (two days if you grafted young), it is important to gradually reduce the humidity by partially opening the dome or turning off the humidifier. Keeping the humidity high for an extended time lead scions to develop adventitious roots (Figure 9). If these roots grow into the soil, it may infect the scion with soilborne diseases.
After you reduce the humidity to about 70 percent, some plants might show wilt. It could help the plants recover by slightly increasing the humidity. If the potting medium you are using has low water-holding capacity, make sure it is moistened when the ambient humidity starts to drop.
While you are gradually reducing humidity, it also is important to gradually introduce light — photosynthesis produces energy that helps plants recover. If you keep plants in high humidity and without sufficient sunlight for more than seven days, the grafts are likely to fail.
It is important to remember that you want to reduce humidity and introduce light gradually. If you sharply decrease humidity or suddenly expose plants to strong light, they may wilt severely and be unable to regain turgor. This gradual reduction of humidity and introduction of light should take place over roughly four to eight days.
The grafting clips will usually drop off when plants grow and their stems increase in diameter. It is preferable to let the clips fall off rather than remove them, which could break a young graft union (which cannot be reconnected). During the first week, water and fertilize the soil directly, because grafting clips could retain water or fertilizer solution around the graft union, which also lead scions to develop adventitious roots.
Grafting tomatoes requires extra effort, time and cost, and may not be suitable in all situations. Before you decide whether to incorporate grafting into your tomato production system, consider specific disease pressures, market strategies, scion and rootstock cultivars, and production practices.