

Introduction
Geraniums and tender tuberous flowering plants will not survive Indiana winter temperatures. However, they can be lifted from the garden and stored indoors, or, in the case of geraniums, carried over as actively growing plants indoors. Such carryover of planting stock can considerably reduce cost for the following season.
Authors
Michael N. Dana and B. Rosie Lerner
Geraniums
Geraniums form no resting structures (i.e., bulb, tuber). Thus, they must be carried over winter as stem and leaf tissue that is either actively growing or dormant. Many modern hybrid cultivars can be raised as annuals from seeds. However, some cultivars, notably most of those with double flowers or variegated foliage, are only propagated vegetatively and must be carried over the winter by one of the methods described in this publication.
Select only healthy appearing plants for carryover. Geraniums grown outdoors often become infected with bacterial or viral diseases. Infected plants store poorly and will perform poorly the next season. Discard any plants showing symptoms such as leaf spots, wilting, stem darkening, rotting, shriveling, or blotchy coloration.
Cuttings
The cutting method requires taking tip cuttings or slips before frost (Figure 1). Select the desired number of 3- to 4-inch shoot tips and strip off the lower leaves. Dip the cut end in a rooting hormone.
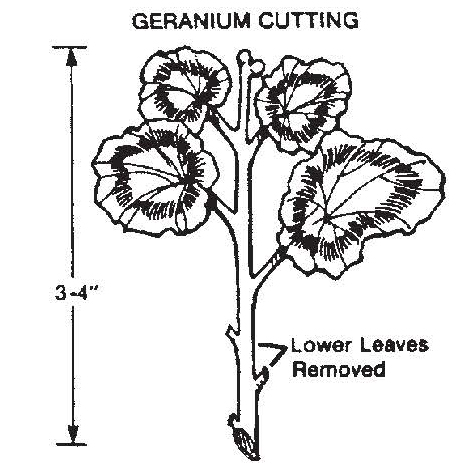
before frost when the plant is still actively growing.
Use a clean, sharp knife, and remove lower leaves
prior to sticking in rooting medium.
Stick the cutting in a rooting medium of coarse sand or a mixture of coarse sand and sphagnum peat moss (1:1 by volume). A flower pot or wooden container that holds 3-4 inches of rooting medium and has bottom drainage holes is sufficient. To allow air movement and prevent the rapid spread of disease, separate the cuttings so they do not touch each other. Water the cuttings thoroughly and cover the container and its contents with a plastic bag. Place in a brightly lighted location, but out of direct sunlight. It is better to keep the cuttings and rooting medium somewhat dry to decrease the chance of disease. Roots should develop in 3-4 weeks.
After the cuttings have rooted, place each in a separate pot without plastic covering, and set in a well-lighted spot such as a south window. For flowering, geraniums need at least 4 hours of direct sunlight every day. If youʼre not interested in flowering, less brightly lighted locations are satisfactory to maintain growth. In the home, night temperature may be higher than the 55-60°F which is best for geraniums, resulting in spindly plants. Frequent pinching, increased light, and liquid fertilization with low nitrogen, high phosphorus, and potassium fertilizer will help minimize spindliness.
Potted Plants
Whole plants can be lifted from the garden, potted, and brought indoors. Cut each back to about 1/3 the original height. Use pots 6-8 inches in diameter. After potting, water thoroughly, and begin monthly fertilization about 1 week later. Initially, place the plants in a well-lighted location to help them adapt to indoor conditions. They can then be moved to a reduced light area as described for cuttings.
Dormant Plants (Hanging Method)
Prior to frost, dig geraniums and carefully shake all the soil from the roots without damaging the roots. Hang the plants upside down in a cool dark place where the temperature is 45-50°F and the humidity is low. A cool, soak the roots in water for 1-2 hours, and apply a protective fungicide*. Most of the leaves will dry and fall during the winter.
After frost danger in the spring, cut the plants back to about 1/3 of their original height and plant in the garden. Water and fertilize as for other bedding plants. If desired, the plants can be potted up and started indoors earlier.
Cannas
After the tops of Cannas have been killed by frost, allow them to dry for several days. Then cut back the tops to 3-4 inches of stem and carefully lift the roots (Figure 2) with a fork or spade. Turn the clump of roots over and allow to dry for a few hours.
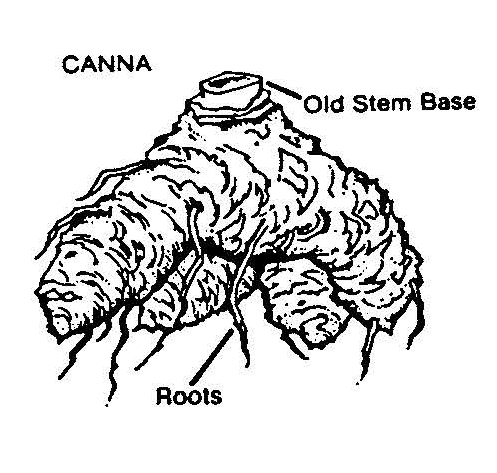
growth points. Buds are located in the old stem
base. When dividing, be sure a portion of the stem
is included with each root division.
Apply a fungicide* according to label directions, and store in a cool, moderately dry area where the temperature will not go over 50°F. Place on shelves or racks or hang in mesh bags so that air can circulate freely among the clumps. Do not allow the roots to freeze.
In the spring, each clump can be planted as a full clump or divided. Be sure that there is a portion of an old stem base in each division since the new growth buds are in the old stem.
Dahlias
The dahlia plant is ready to be dug when it is darkened by frost. Cut the top back to 4-5 inches, and lift gently with a fork or spade so as not to injure the tuberous roots (Figure 3). Remove as much of the soil as possible without damaging the roots. Only save roots from healthy plants. Divide the tuberous roots soon after digging because the eyes or buds are easier to see in the fall. Each root must have at least one eye. Apply a protective fungicide* and allow the roots to dry in the air for several hours. Then store in a dry, cool, frost-proof area. If the air is very dry, the roots may shrivel. To avoid this, wrap the clumps in newspapers or pack them in barrels or boxes of peat moss, vermiculite, dry sawdust, or sand.
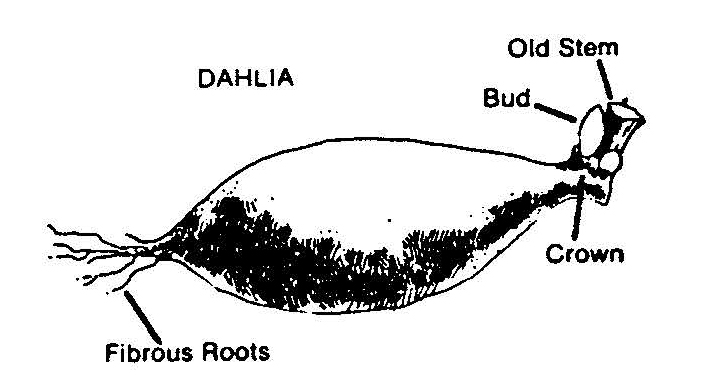
potato. Note the bud located at the base of the old stem,
a region often called the crown.
Check the condition of the roots several times during the winter. Discard any that show signs of decay.
Gladioli
Gladiolus corms should be dug after frost. Although some growers dig the corms of early flowering cultivars 6-8 weeks after flowering, well before frost, this is not necessary. It is, however, critical to allow all corms to mature as fully as possible prior to digging. Dig the corms (Figure 4) of healthy plants with a fork or spade so that the entire plant can easily be removed by grasping the top and pulling the plant out of the soil. Avoid bruising or injuring corms while digging and handling. Shake off all loose soil and discard damaged, discolored, or diseased corms. Cut the top off 1-2 inches above the corm. Save the small cormels separately if you so desire. Allow the corms to dry in the sun for 1 or 2 days.
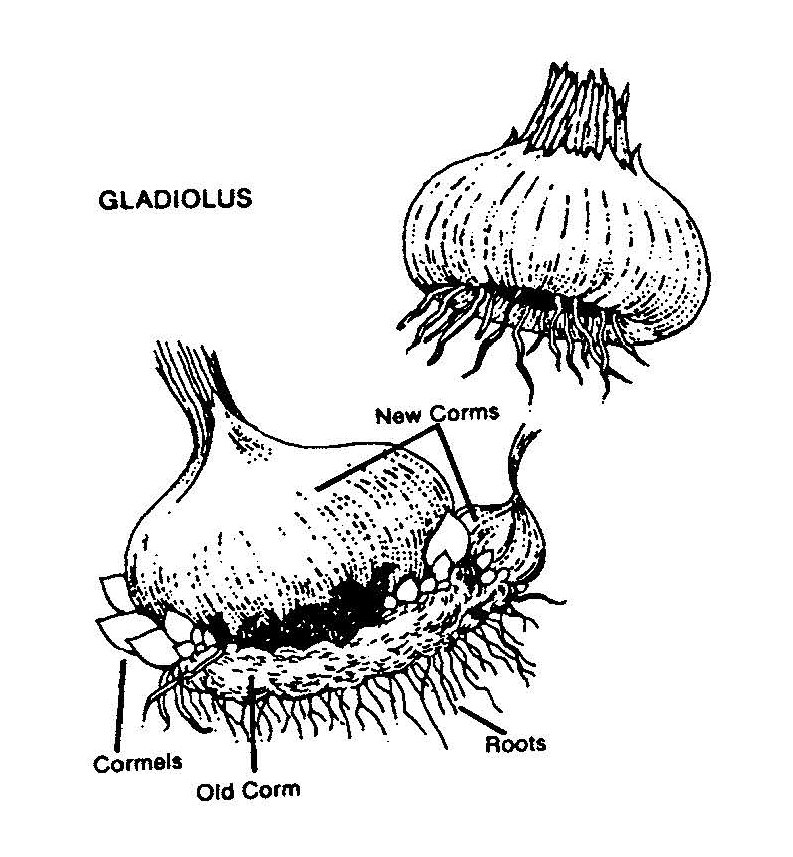
old corm. Small corms called cormels form around the
base of the new corm. They can be planted but will require
2-3 years to reach blooming size.
After drying, sift out excess soil and place corms in wooden flats or trays. For best results, cure at a temperature of 80-85°F for 2-3 weeks. Avoid fluctuating temperatures, which cause moisture condensation on the corms and increase the chance of disease. When thoroughly cured, the old corm should be broken from the base of the new one and discarded. Two to three additional days at 80°F will hasten the formation of a corky layer at the scar.
Gladiolus corms are often infected with various disease-producing fungi which reduce stand, plant, and spike size. To avoid disease problems in storage, dust freshly dug, clean corms with a fungicide*.
Gladiolus corms are often infected with various disease-producing fungi which reduce stand, plant, and spike size. To avoid disease problems in storage, dust freshly dug, clean corms with a fungicide, A fungicide ("bulb dust") approved for protecting bulbs and similar plant parts in storage can be used as a protectant. Place dust and bulbs or other structures in a paper sack and shake vigorously. Always ready and follow the label directions. It is illegal to use any pesticide in a manner that is inconsistent with the product label.
For winter storage, place the corms in paper boxes, open paper bags, cloth bags, wooden trays with screen bottoms, or old onion sacks. Stack or hang the containers so air can move among them. Store the corms at 35-40°F in low humidity. A cool basement is quite suitable. Do not allow corms to freeze.
Caladiums and Tuberous Begonias
When the tops of caladiums and tuberous begonias are injured by the first fall frost, gently lift the plants and cut back the stem to the soil line. Leave the ball of roots and soil intact.
Place the soil and root masses in a dry, cool storage area, and allow the tubers to cure for 2-3 weeks. Then remove the balance of the soil, stalks, and roots, cut out any rotted spots, and dust with fungicide* (Figures 5 and 6).

underground stem. New tubers grow from the sides
of the original one. Buds are localized near the top
of the tuber.
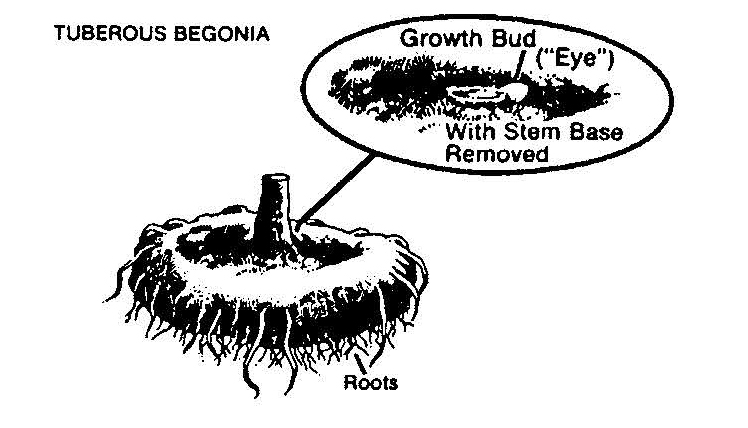
enlarges as it grows, but does not form multiple tubers.
roots arise from any part of the tuber surface. Buds are
found in the top center of the tuber near the stem base.
Store the tubers at 50°F in low humidity. Pack the tubers in dry peat, sand, sawdust, or vermiculite to prevent excessive moisture loss.
*A fungicide ("bulb dust") approved for protecting bulbs and similar plant parts in storage can be used as a protectant. Place dust and bulbs or other structures in a paper sack and shake vigorously. Always ready and follow the label directions. It is illegal to use any pesticide in a manner that is inconsistent with the product label.