

Introduction
Most home gardeners consider annual flowers among their favorites. Although annuals only live for one year, most provide season-long color, making them a good value. Annuals come in a wide array of colors, shapes, and sizes. Marigolds, petunias, and impatiens are among the most popular, but there are many other annuals that are both practical and easy to grow.
Authors
Michael N. Dana and B. Rosie Lerner
This publication was previously authored by John Wott.
Uses
The term “annual” describes plants that go through their entire life cycle—from germination to seed production—in a single year. Because they last only one growing season, annuals are versatile members of the garden. In addition to offering a diverse palette of color on their own you can also:
- Plant annuals among perennials or shrubs in a new bed where you need to fill spaces between small, developing plants.
- Use annuals to add accent in planters, boxes and urns (next year you can pick a new pallet!).
- Plant them over fading spring flowering bulbs. Annuals add color in summer without interfering with next spring’s flowers.
- Grow annuals in a garden for summer cutting or for drying to make winter arrangements.
- Create a temporary low-growing hedge or border of annual plants along a foundation.
As you choose annuals to plant, think about color, form and texture. For example, you can choose lacey Nigella for a dainty effect or bright, coarse coneflowers for a bolder presentation.
Although most annuals bloom all season, there are some that offer only seasonal interest. The sweet pea and other cool-weather annuals quit blooming in the heat of summer. Coneflowers begin their show in mid to late summer. Pansies can be planted in fall to provide early spring blooms.
Location
Most flowering annuals grow best in full sun and well-drained soil. Sun-loving plants that are grown in shade tend to be spindly and produce fewer flowers. Likewise, shade-loving annuals tend to get leaf scorch and flower poorly when grown in too much sun.
Few annuals will thrive when planted in wet, heavy soil. Before you plant, check to see how well the soil drains. Dig a hole 10 inches deep and fill it with water. If the water drains quickly, you have a droughty soil. Adding organic matter will aid water and nutrient retention. If the water drains after an hour or two, you have a well-drained soil. If the water stands overnight, you have poorly drained soil and may need to consider constructing raised beds.
Choose plants that can thrive in the environment you have. Table 1 lists information on germination, location, and spacing for many popular annuals. You can also find similar information on seed packets and plant tags.
Soil Preparation
If you’re working ground that has remained unplanted for at least a year, add organic matter, such as peat moss, compost, or well-rotted manure the previous fall. For established planting beds, add organic matter several weeks before planting in spring. Spade or till the top six to eight inches of soil, thoroughly incorporating the organic materials.
To start annuals from seed directly in the garden, level the bed and rake it smooth after tilling. Remove all stones, clods, and old plant refuse.
To plant annuals into a bulb or shrub bed, cultivate only lightly. You can add a little organic matter to help annuals become established, but excessive cultivation will damage the roots of established plants.
If you plan to grow your annuals in containers, use new potting mix each year. Try a mix of garden loam, sphagnum peat moss and vermiculite or perlite (1:1:1 by volume) or use commercially available mixes. Containers should be large enough to provide adequate space for root growth and must have drainage holes in the bottom to allow excess water to escape.
Fertilizer
Add fertilizer to soil as you cultivate and incorporate organic matter. Use one to two pounds of 5-10-5 or similar analysis, fertilizer per 100 square feet of bed area. If the soil fertility is low, you may need to fertilize again during the growing season. Usually, 1/2 -1 pound of 5-10-5 per 100 square feet every month to six weeks will suffice. For home gardeners, remember that one pound of dry fertilizer is about equal to 2 cups or 96 teaspoons. Therefore, use 1-2 cups of dry fertilizer per 100 square feet, or about 1 teaspoon per square foot. Do not let dry or concentrated liquid fertilizer touch the foliage or flowers. Water thoroughly after applying fertilizer.
Seeds
Seeds of a few plants, including babies-breath and gaillardia, can be sown as soon as you can work the soil in early spring. For most other annual flowers, wait until soil warms above 60°F before sowing outdoors. (Table 1).
Table 1. Planting Selected Garden Annuals Sown as Seeds
Planting times: ES=Early Spring, LS=Late Spring
Exposure: FS=Full Sun, PSH=Partial Shade, SH-Shade
| Plant | Germination Time | Planting Time/Exposure | Spacing |
|---|---|---|---|
| Ageratum | 5 | LS/FS | 10-12 |
| Amaranthus | 10 | LS/SS | 10-12 |
| Aster | 8 | LS/FS | 12-14 |
| Babies Breath | 10 | ES/FS | 10-12 |
| Bachelor’s Button | 10 | ES/FS | 8-10 |
| Calendula | 10 | ES/FS | 8-10 |
| Calliopsis | 8 | LS/FS | 10-14 |
| China Aster | 8 | LS/FS-PSH | 10-12 |
| Cockscomb | 10 | LS/FS | 10-12 |
| Cornflower | 10 | ES/PHS | 12-14 |
| Cosmos | 5 | LS/FS | 10-12 |
| Forget-me-not | 8 | LS/FS | 10-12 |
| Four-o’-clock | 5 | LS/FS | 12-14 |
| Gaillarda | 20 | ES-LS/FS | 10-12 |
| Geranium | 14 | LS/FS | 10-12 |
| Lupine | 20 | ES/FS | 6-8 |
| Marigold | 5 | LS/FS | 10-14 |
| Morning Glory | 5 | LS/FS | 24-36 |
| Nasturtium | 8 | LS/FS | 8-12 |
| Petunia | 10 | ES/FS | 12-14 |
| Phlox | 10 | ES/FS | 6-8 |
| Portulaca | 10 | LS/FS | 10-12 |
| Rudbeckia | 20 | LS/FS-PSH | 10-14 |
| Scabiosa | 10 | ES-LS/FS | 12-14 |
| Sweet Alyssum | 5 | ES/FS | 10-12 |
| Spiderflower | 10 | ES/FS | 12-14 |
| Strawflower | 5 | LS/FS | 12-14 |
| Sweetpea | 15 | ES/FS | 6-8 |
| Zinnia | 5 | LS/FS | 8-12 |
Most annuals can be started from seed indoors or in hotbeds or cold frames outdoors to get a head start on the growing season. You want to time the sowing of seeds so that plants will be ready for transplanting to the garden when the appropriate weather arrives. A few annuals, such as poppies and sweet pea, don’t transplant well and should be sown in their permanent location. For more information, read HO-14, Starting Seeds Indoors http://www.hort.purdue.edu/ext/HO-14.pdf and HO-53, Hotbeds and Coldframes http://www.hort.purdue.edu/ hort/ext/Pubs/HO/HO_053.pdf.
Purchase fresh seed from local garden centers or reputable mail-order catalogs. Saving seeds from old-fashioned varieties can work well, but many of today’s annuals are F1 hybrids. Seeds from these plants often grow into plants very different from their parents in color, size, or habit of growth.
Sowing
Smooth the seedbed, then make a furrow for the recommended sowing depth with a rounded stick or hoe handle. Place seeds in the furrow and cover them with a fine layer of soil or light mulch such as vermiculite (see Figure 1). Water gently to moisten the furrow trying not to disturb the seeds.
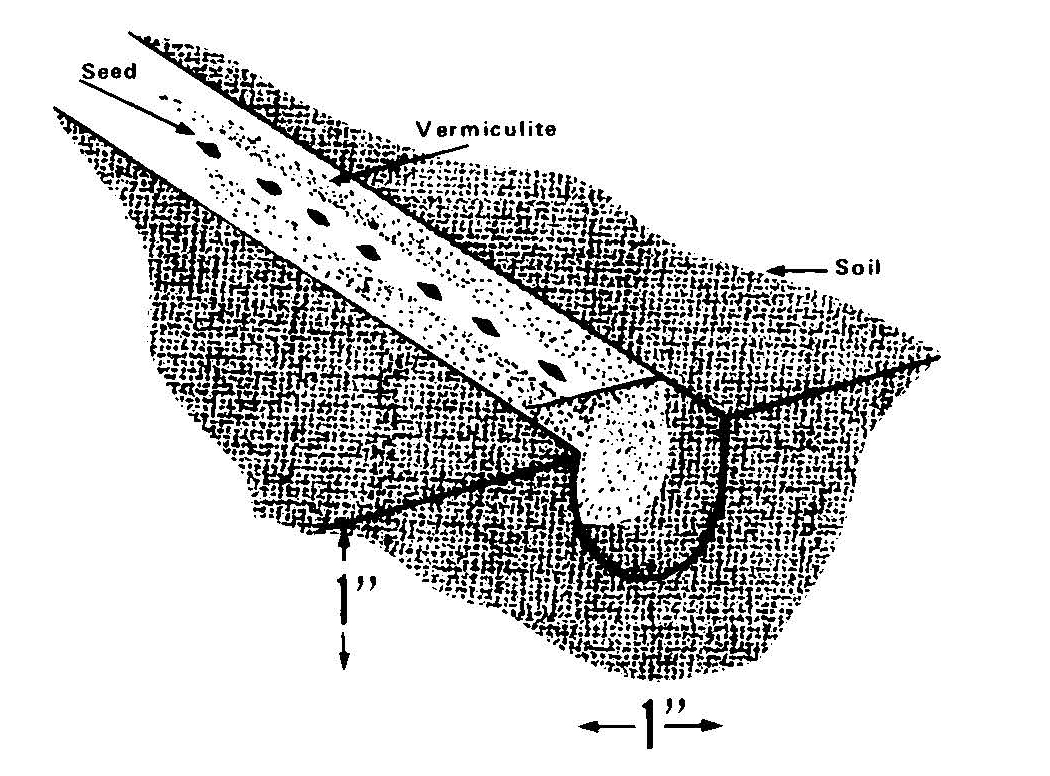
Good soil preparation will help promote speedy seed germination. However, in heavy soil, it can be helpful to cover the seed with fine vermiculite or finished compost to prevent a hard soil crust from interfering with seedling emergence.
Label all plants with the plant and cultivar for later ease of identification.
Thinning
When the seedlings have developed two true leaves, thin them by pinching out excess plants or transplant them to another location. Use the recommended spacing in Table 1 to allow each individual plant to receive enough light, water, nutrients, and air for proper growth and development.
Transplanting
Many homeowners find it more convenient to buy started seedlings rather than start their own. Most annuals transplant easily and often are already blooming when you plant them, though your selection will be more limited than if you started from seed. Choose vigorous looking plants with healthy looking leaves.
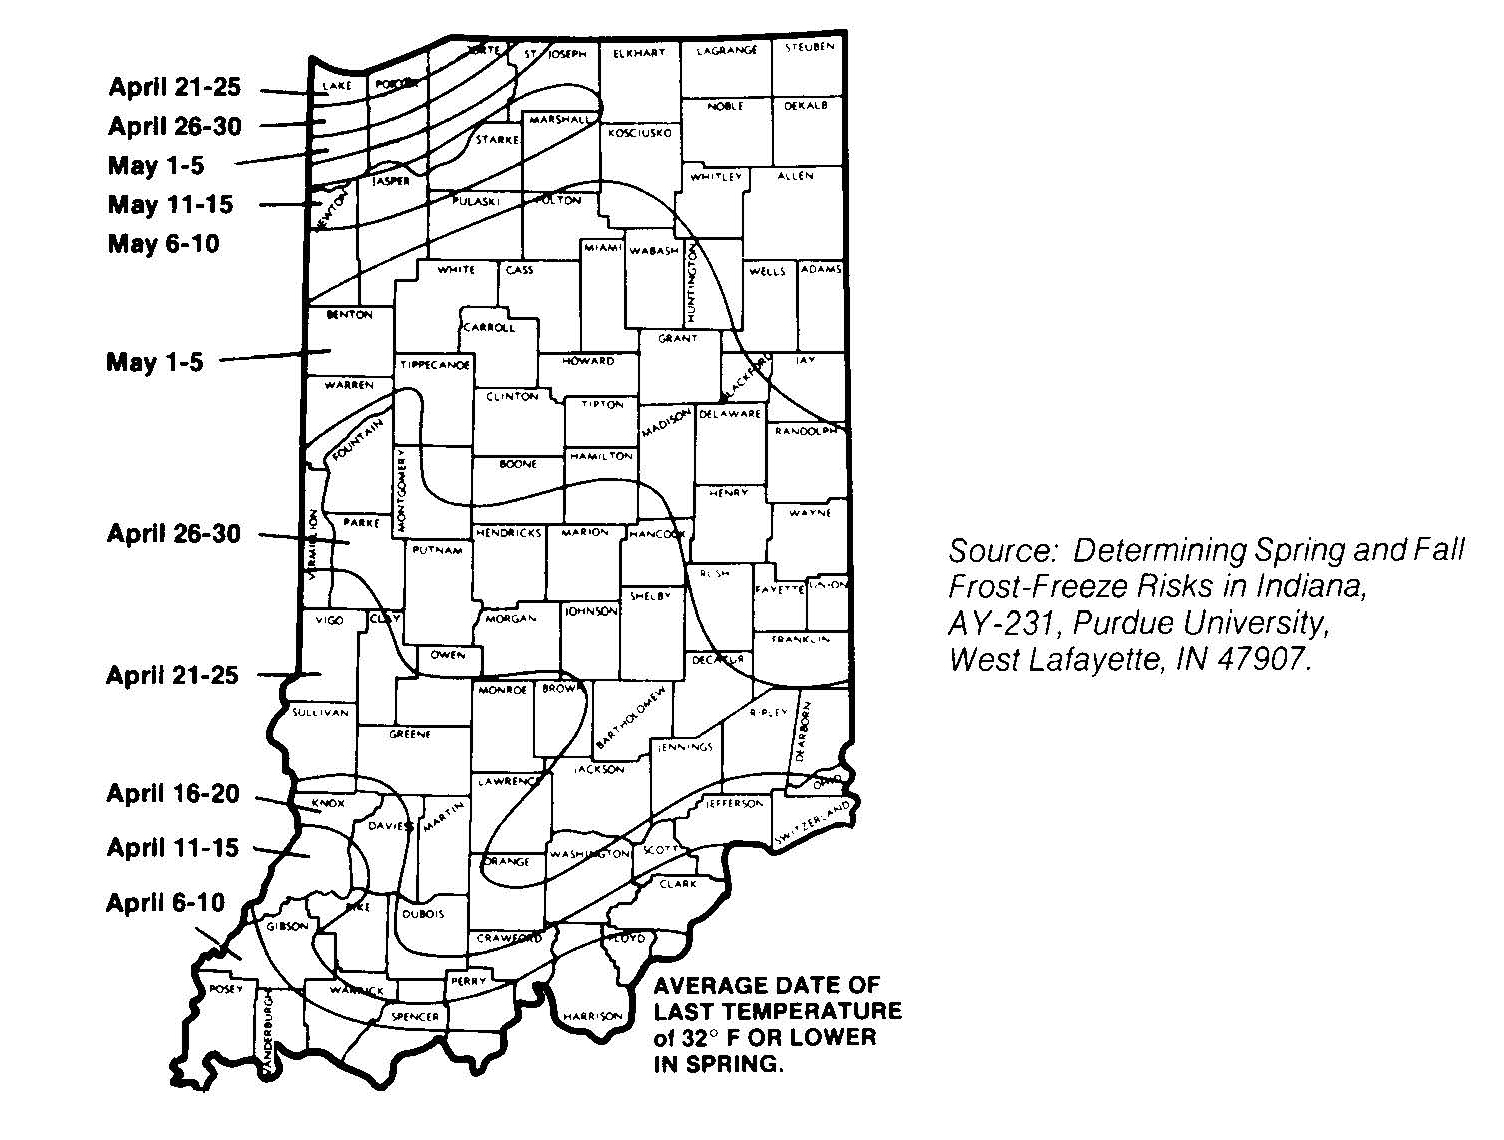
Most annuals should be transplanted outdoors after the danger of spring frost has passed: May 1, southern Indiana; May 15, central; May 20-30, northern (see Figure 2).
If you’ve raised your own seedlings in a greenhouse or in some other controlled environment, it is helpful to harden them off before planting outside. The goal is to gradually increase exposure to wind, sun, and drought. Put the seedlings outside next to the house, and bring them inside at night at first. After a few days, you can leave them out at night but protect them if the temperature dips close to freezing. After a week or so they’ll be ready to plant out in the open.
To remove seedlings from trays or flats, slice downward through the soil between the plants with a knife. To remove seedlings from fiber, plastic, or clay pots carefully lift out each plant with its intact block of soil.
To transplant seedlings in peat pots, tear off the lip of the pot that would otherwise extend above the soil surface as a safeguard, or the lip may absorb water away from tender seedling roots (wicking). Peat moss can be difficult to wet once it becomes dry, forming an impenetrable barrier between the roots and the surrounding soil. To ensure root penetration, poke holes or remove the bottom of the pot. You can plant the sides of the pot with the seedling.
Set the plants at the same depth they were growing in the original container and at their recommended spacing. Press the soil firmly around the plant. To help give the root system a boost, water with a dilute, high phosphorus fertilizer solution, such as one tablespoon of high phosphate fertilizer (10-52-17 or similar analysis) in 1 gallon of water.
Mulching
Mulching flower beds not only makes them look better, it conserves moisture, reduces weed growth, and can help moderate soil temperature. Common mulches include straw, wood chips or shreds, ground or crushed corn cobs, pine needles, and black plastic. Apply 2-3 inches of mulch around the plants after soil has had a chance to warm. Black plastic mulch will warm the soil and is particularly effective for heat-loving plants such as petunias, marigolds, and zinnias.
Pinching
Most annuals benefit from pinching (see Figure 3), resulting in more flowers during the growing season, even though it may remove blooms initially. The first pinch should remove the top inch or two from the growing tip, leaving 3 or 4 leaves. Greenhouse-grown transplants have usually been pinched by the grower so check the plants at purchase time. Many annuals that bloom all summer will benefit from additional pinching throughout the summer to keep them compact and full of blossoms.
Cultivation
Lightly cultivate soil early in the season to break the crust that forms on the surface. After the plants are growing vigorously, stop cultivating. When you cultivate large plants you may damage some of the shallow feeder roots. Cut weeds off with a shaving stroke at the soil surface instead of pulling them. Pulling weeds usually brings other weed seeds to the surface, where they will germinate. Mulching will eliminate the need for cultivation.
Watering
Generally, plants need a single watering of 1 inch of water each week. Watering with a sprinkler or soaker hose works better than with a hand-held hose since it can take 1-3 hours to provide sufficient water. Allow the water to penetrate at least 6-8 inches into the soil. Soaker hoses are most efficient, since they apply the water slowly and directly to the soil, reducing water loss to runoff and evaporation.
Flower Removal (Deadheading)
Annuals are prolific bloomers on their own but removing old, faded blooms every 5-7 days will help encourage additional blossoms. This is called deadheading. When you leave spent flowers untouched, the plant puts its energy into developing seeds rather than into producing more flowers. In some cases, the fruits or seeds are themselves ornamental and you’ll want to let them develop. Ageratum, calendula, cosmos, marigold, pansy, rudbeckia, scabiosa, and zinnia respond especially well to deadheading.